NovaStar H20 troubleshooting should begin with the signal chain, not a factory reset. A black LED wall can be caused by the source, an input card, a disabled layer, the output mapping, a fiber or Ethernet link, a receiving card, or panel power. Changing several settings at once hides the real fault and can turn a recoverable problem into a lost configuration.
This guide gives LED technicians, integrators, and venue operators a practical sequence for isolating common H20 problems. Interface labels can vary by H Series software and firmware version, so compare every high-risk action with the current NovaStar H Series product page, official user manual, and release notes for the exact system in service.
1. Start NovaStar H20 Troubleshooting with the Signal Chain
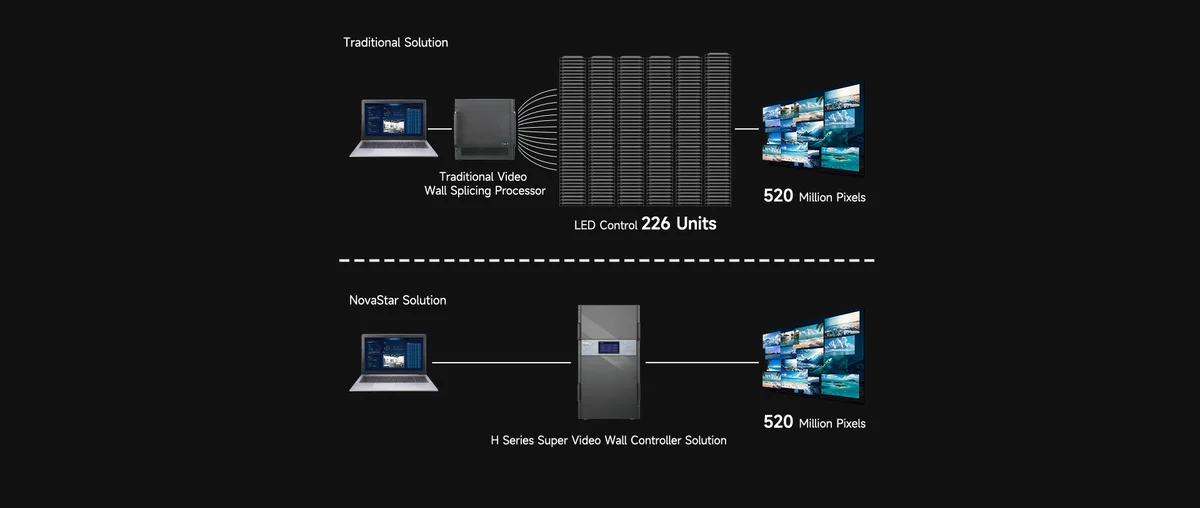
The H20 is a modular video wall splicer that can combine video processing and LED sending control in one chassis. That integration removes equipment from the rack, but it also means a symptom at the screen can originate in several internal or external stages. Read the system from left to right:
- Source device and source output settings
- Cable, extender, converter, and H20 input card
- Input source assignment, layer, crop, scale, and canvas
- H20 output card and sending configuration
- Fiber or Ethernet distribution
- Receiving cards, cabinet data path, power, and LED modules
1.1. Preserve the last known-good configuration
Before troubleshooting, export the current project or preset if the software provides that option. Photograph the H20 card positions, label every input and output cable, and record the software and firmware versions. Do not update firmware, reseat cards, or restore defaults during a live event. These are planned maintenance actions, not first-response tests.
1.2. Build a known-good test path
Use one laptop or test generator set to a conservative format such as 1920 x 1080 at 60 Hz, one known-good short cable, one confirmed input, one layer, and one screen. If that path works, add the original source, extender, higher resolution, additional screens, and backup paths one at a time. The exact step that reintroduces the fault identifies the layer to investigate.
2. Quick Reference for Common H20 Faults
Use the table below to choose the first inspection point. It is a routing guide, not a substitute for the project file and official H Series documentation.
| Symptom | First check | Next isolation step |
|---|---|---|
| Entire LED wall is black | Panel power, H20 blackout state, active layer, and output link | Test one known-good input and one mapped output |
| Input reports no signal | Source output, connector, cable, and input card slot | Use 1080p60 and a short certified cable |
| Image is cropped or has black bars | Source aspect ratio, EDID, layer crop, and canvas size | Reset only the affected layer geometry |
| Flicker or intermittent picture | Bandwidth, cable length, extenders, optical link, and power | Reduce resolution or refresh rate and bypass adapters |
| Software cannot find the H20 | Management port, IP address, subnet, and duplicate IPs | Connect one computer directly with a static compatible IP |
| Backup does not switch | Backup mode, source health, device role, and link state | Run a controlled failover test before the event |
3. Fix a NovaStar H20 Black Screen or No Output
A NovaStar H20 black screen is not proof that the processor has failed. First determine whether the screen is electrically off, receiving data but displaying black, or receiving no data at all. Check cabinet power indicators and distribution separately from the H20. If a test pattern generated downstream of the source appears, the LED wall and part of the output path are alive.
3.1. Check blackout, layer visibility, and source assignment
Confirm that global blackout is off, the intended screen is selected, the layer is enabled, opacity is above zero, and the correct input is assigned. Recall of the wrong preset can leave a valid source outside the visible canvas or behind another full-screen layer. Create a temporary layer in the center of the canvas rather than changing the whole project.
3.2. Separate H20 output from cabinet-side faults
Inspect the output card and link status, then trace the first cabinet in the data chain. A complete wall failure often points to the first distribution link, while a failure beginning at one cabinet usually points to that cabinet, its receiving card, or the cable feeding it. Compare the physical data path with the saved screen connection file. The EagerLED NovaStar VX1000 setup guide explains the same practical distinction between processor-side settings and LED sending-card mapping.
4. Resolve H20 No-Signal and Unsupported-Format Errors
When the H20 reports no signal, verify the source before editing the screen. Confirm that the computer is actually outputting to the connected port, not only to its local display. Bypass the switcher, matrix, converter, or extender and connect the source directly with a known-good cable. If 1080p60 works but the production format does not, the fault is likely bandwidth, EDID negotiation, a cable or extender limit, or an input-card capability mismatch.
4.1. Verify connector, EDID, resolution, and refresh rate
Select the physical port and card slot actually in use. Read the detected input format in H Series software and compare it with the source. Use an EDID that the source, cable path, and H20 input card all support. For protected content, confirm HDCP compatibility across every device in the chain; a valid desktop can coexist with black protected video when one link does not meet the content-protection requirement.
4.2. Isolate the input card without moving the fault
Test another connector on the same card, then a confirmed input on another card if the project permits. Change one variable at a time. Do not reseat or move modular cards while the chassis is powered unless the exact NovaStar manual explicitly authorizes that procedure. If the fault follows the cable or source, the card is probably not the cause. If every known-good source fails only on one input card, schedule a powered-down inspection and contact qualified support.

5. Correct Cropping, Black Bars, Wrong Size, or Soft Images
Geometry problems usually come from a mismatch among source resolution, input crop, layer size, screen canvas, output resolution, and LED mapping. Write down the intended canvas size and native LED pixel dimensions before changing anything. A 3840 x 2160 source does not automatically mean the LED wall should be configured as a 3840 x 2160 screen.
5.1. Match the source to the production canvas
Check whether the source uses the expected aspect ratio and whether its operating system is adding overscan or scaling. Confirm the input EDID and detected timing, then inspect the H20 output resolution. If text is soft, avoid unnecessary double scaling. A clean workflow scales once, at a known stage, to the target canvas.
5.2. Reset only the affected layer geometry
Inspect crop values, layer X/Y position, width, height, and scaling mode. Temporarily place the layer at the canvas origin with a size that is smaller than the screen. If all four edges appear, expand it deliberately. This is safer than resetting the complete H20 project and preserves other screens, presets, and backup relationships.
6. Stop Flicker, Sparkles, Tearing, or Intermittent Video
Intermittent artifacts are often physical-link or bandwidth problems rather than a processing defect. Replace long or unverified cables with a short known-good cable. Bypass adapters and extenders. Confirm power to active optical cables, converters, and distribution equipment. For fiber paths, verify matched optical modules and clean connectors using approved fiber-cleaning practices.
6.1. Reduce the format before replacing hardware
Reduce the source to a lower resolution, refresh rate, or color depth. If the image becomes stable, calculate the bandwidth of the complete path and verify every device against that format. NovaStar states that the H Series supports high-resolution workflows, including 4K 120 Hz with suitable hardware, but the weakest cable, converter, input card, or extender still limits the real system.
6.2. Distinguish video artifacts from LED refresh artifacts
If the wall looks stable to the eye but shows bands or rolling lines on camera, compare camera shutter, frame rate, LED refresh rate, scan mode, and brightness settings. That is a camera-to-LED timing problem, not necessarily an H20 input failure. Test the proposed settings with the actual cameras before the production date.
7. Fix Color, Brightness, Layer, and OSD Problems
A washed-out or crushed image can result from a full-range versus limited-range mismatch, RGB versus YCbCr conversion, HDR/SDR mismatch, incorrect bit depth, or downstream calibration. Compare a known test pattern on a reference monitor and the LED wall. Make color changes at one stage only, then document the chosen pipeline.
7.1. Check the layer stack and screen selection
When a layer, logo, clock, or OSD is missing, check whether it is enabled on the correct screen, inside the visible canvas, above the intended background layer, and using non-zero opacity. Recall the expected preset and confirm it completed. If a layer freezes, test the source on another layer before rebuilding the whole screen.
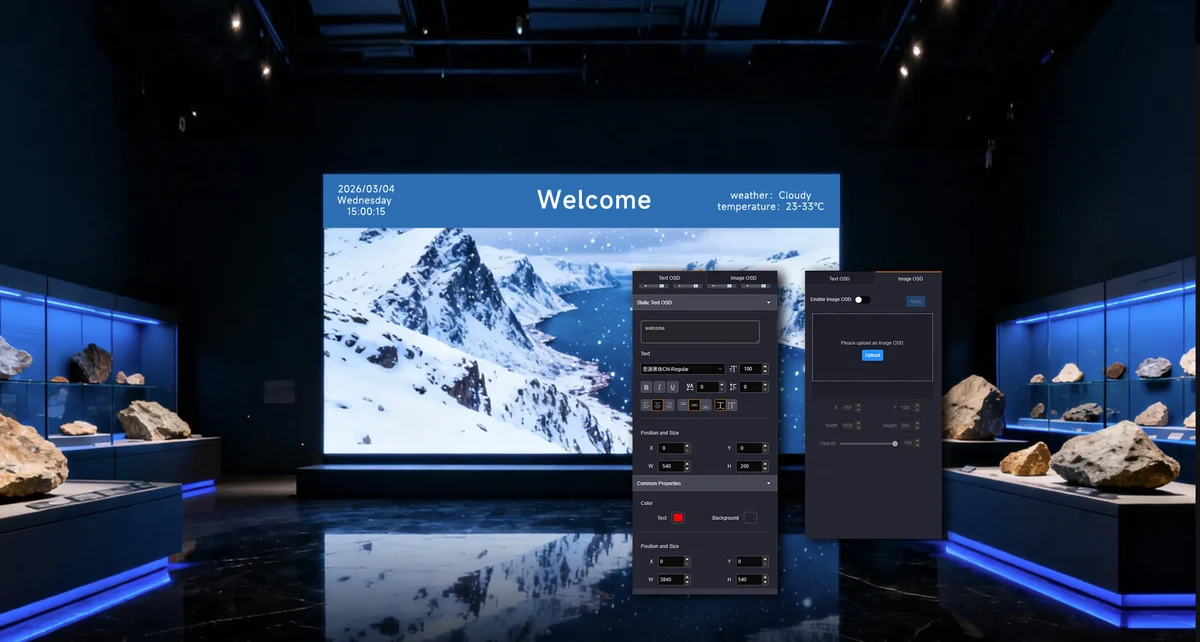
7.2. Separate processor settings from receiving-card calibration
If every cabinet shows the same color error, inspect the source and processor pipeline first. If one cabinet or module differs, inspect receiving-card configuration, module calibration, and hardware on that section. Do not overwrite receiving-card parameters across the whole wall to correct one cabinet. EagerLED keeps current utilities and documentation on the NovaStar software download page.
8. Restore H20 Software and Network Communication
If H Series software cannot discover or control the H20, start with the management network. Confirm the computer is connected to the management port, the H20 and computer are in compatible IP ranges, and there is no duplicate IP address. Temporarily disconnect Wi-Fi and VPN software so the computer does not route discovery traffic through the wrong adapter.
8.1. Test a direct management connection
Connect one service computer directly, assign a compatible static IP if required, and confirm basic IP reachability before blaming the application. Then verify the software version supports the installed H20 firmware. A firewall can block discovery even when direct IP communication works, so test the approved application rule rather than disabling all endpoint protection permanently.
8.2. Confirm the project, preset, and controller are synchronized
After communication returns, read the current device state before writing an old project. Compare screen names, card slots, sources, output mappings, presets, and backup roles. Save a fresh recovery copy only after the system is verified. This avoids overwriting a newer working configuration with a service laptop’s stale file.
9. Repair Hot-Backup and Redundancy Failures
NovaStar describes H Series redundancy options that can include input-source backup, device backup, power-supply backup, and link backup, depending on the installed cards and system design. A configured backup is not the same as a tested backup. Verify that the backup source is live, the main and backup roles are correct, both devices use compatible projects, and the failover trigger matches the intended failure.
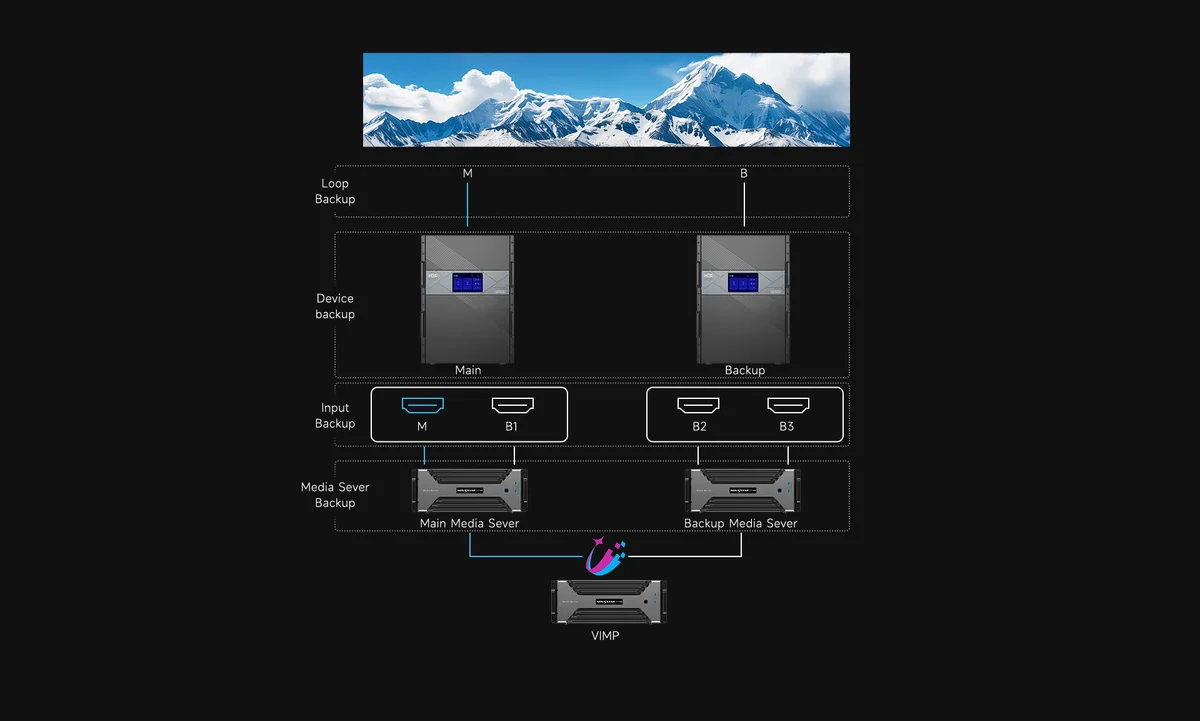
9.1. Run a controlled failover test
Test one failure mode at a time during a maintenance window: loss of the main input, loss of a main link, or loss of the primary device. Observe the switching time, image continuity, monitoring alarm, and restoration behavior. Never discover on show day that the backup source carries a different format, the secondary project is stale, or a redundant power supply is not connected to an independent circuit.
10. Handle H20 Firmware, Power, Thermal, and Restart Problems
Repeated restarts, alarms, or unstable cards require a controlled maintenance response. Confirm rack airflow, fan operation, ambient temperature, dust accumulation, and that front and rear ventilation are not blocked. Check each power supply and feed, including the redundant supply where installed. A backup supply connected to the same overloaded strip is not meaningful redundancy.
10.1. Treat firmware updates as a change-controlled task
Use only the official package intended for the exact H20 hardware and read the release notes first. Export the project, record current versions, provide stable power, keep the management connection uninterrupted, and allow the process to finish. Do not assume the newest available file is the correct recovery file for every installed input and output card.
10.2. Stop when hardware symptoms repeat
If a card repeatedly disappears, the chassis restarts under load, a power alarm returns, or there is unusual heat, odor, or noise, stop cycling the system. Isolate power according to the venue’s electrical procedure and escalate to NovaStar or a qualified service provider. Repeated power cycling can worsen a marginal connector or power fault.
11. Prepare a Technical Support Escalation Package
A useful support request makes the failure reproducible. Collect the following before contacting EagerLED technical support or NovaStar 24×7 support:
- H20 serial number, chassis model, card types, and slot positions
- H Series software, device firmware, and relevant card firmware versions
- Project file, screen connection file, presets, and a last known-good backup
- Source format, cable path, converters, extenders, and optical-module models
- Clear photos of front-panel status, rear cabling, and the first failed cabinet
- A short video showing the fault and the exact action that triggers it
- The isolation tests already completed and their results
This information prevents repeated basic questions and lets support distinguish configuration, compatibility, link, and hardware faults. For comparison with another modular H Series platform, see the EagerLED NovaStar H15 guide.
12. NovaStar H20 Troubleshooting FAQs
13. Conclusion
Reliable NovaStar H20 troubleshooting follows one rule: prove each stage before changing the next one. Start with a known-good source, confirm the input, layer, canvas, output, data path, and LED cabinets in order, and document every result. This method resolves ordinary no-signal, geometry, color, network, and backup problems without sacrificing a working project.
Use firmware updates, card reseating, factory resets, and power-system work only in a controlled maintenance window with the current official documentation and a verified backup. When the fault repeats or points to hardware, stop cycling the system and give EagerLED or NovaStar a complete escalation package.
 Top 10 LED Display Suppliers in Australia (2026 Guide)
 Top 10 LED Screen Manufacturers in Canada (2026 Guide)
Related Posts
Fill In Your Needs In Detail
Fill in the screen usage scene and size you need in “Content”.You will get a quote.