To use an LED pixel pitch calculator, enter the active screen width and height, choose a pixel pitch, and compare the resulting pixel matrix with your content requirements. Then check viewing distance and confirm a buildable module or cabinet layout. For manual calculations, divide each screen dimension in millimeters by the pitch in millimeters.
For example, a 4 × 2.5 m wall at P2.5 produces 1,600 × 1,000 pixels. That is below Full HD’s 1,920 × 1,080 pixels, even if the display accepts a 1080p input. A calculator helps expose this difference before you request a quotation.
This EagerLED guide explains the inputs, formulas, viewing-distance estimates and practical checks behind a shortlist. It uses illustrative conference-room, church-stage and outdoor examples rather than claiming that one pitch suits every installation. The linked tool’s interface was checked on September 29, 2026.
1. The problem: why use a pixel pitch calculator
The LED display planning problem
Consider a corporate lobby with an available display area 4 meters wide and 2.5 meters tall. The nearest viewers stand 3 meters away, the content includes text and video, and the budget is fixed. P2.5, P3 and P4 are possible starting points, but their resolutions differ substantially.
The useful question is which complete display configuration meets the brief. Record the smallest text, viewing positions, source resolution and available installation space before comparing prices. Otherwise, a cheaper screen may require content changes that were never included in the original plan.
Why formulas alone are not enough
The arithmetic is straightforward: horizontal pixels = width in mm ÷ pitch in mm; vertical pixels = height in mm ÷ pitch in mm. For square pixel spacing, pixels per square meter = 1,000,000 ÷ pitch².
However, viewing comfort is not a fixed mathematical cutoff, and dimensions must match whole modules or cabinets. A result of 1,333.3 pixels is a planning estimate, not a realizable pixel matrix. Check units and rounding, then obtain the exact matrix from the proposed hardware specification.
What a useful planning result includes
A useful planning result connects four things: physical size, pixel matrix, viewing conditions and a supplier’s buildable configuration. Keep the inputs alongside the outputs so another person can reproduce the calculation.
A calculator can reduce arithmetic mistakes, but it cannot decide whether your smallest text is readable, whether a frame fits the wall or whether a processor supports the final canvas. Those checks turn a numerical estimate into a usable specification.
2. What is LED pixel pitch? (Quick primer)
Understanding the relationship between physical spacing and pixel count makes the calculator results easier to check.
Pixel pitch definition: the simple version
Pixel pitch is the center-to-center distance between adjacent LED pixels, measured in millimeters. P2.5 means nominally 2.5 mm spacing; it does not describe the total screen resolution. See Planar’s explanation of pixel pitch.
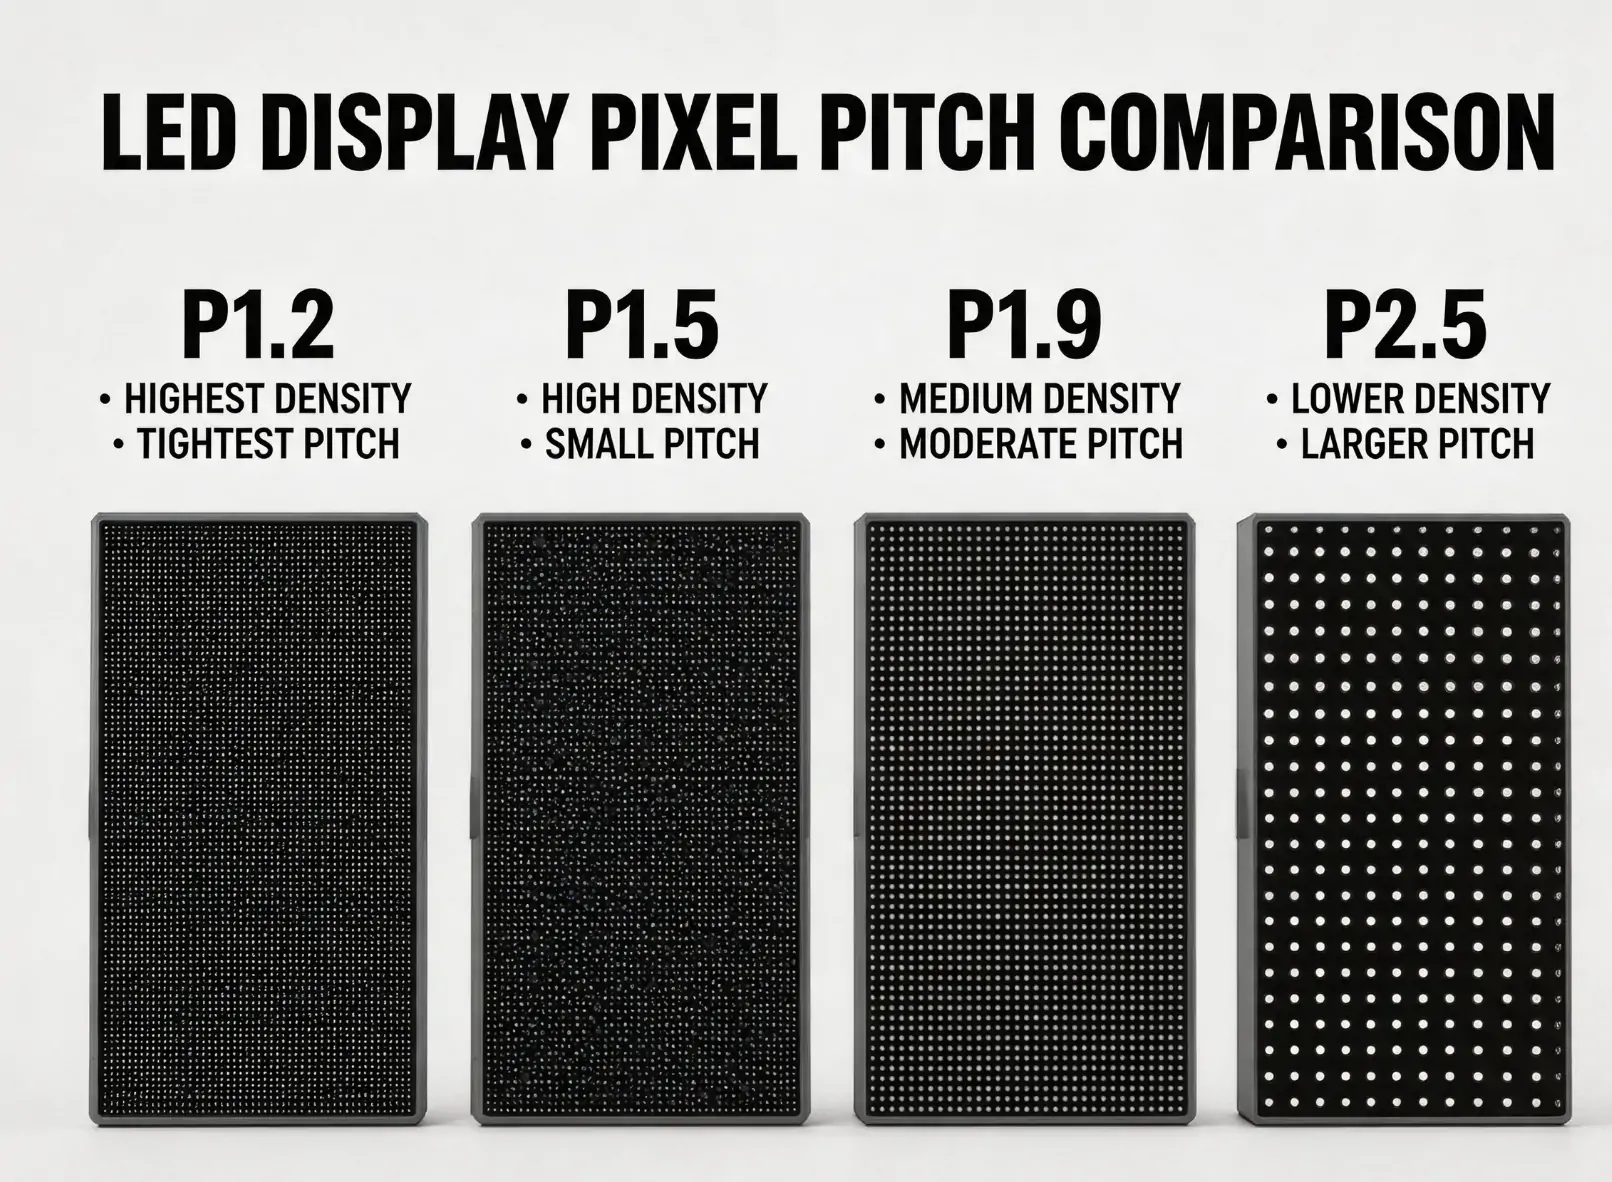
Smaller spacing places more pixels in the same area. Using the density formula, P1.5 gives approximately 444,444 pixels per m², while P10 gives 10,000. These figures describe a square pixel grid, not brightness or color quality.
Why pixel pitch matters
At a fixed screen size, a smaller pitch increases resolution and can make fine detail easier to display. It also changes the pixel structure seen by nearby viewers. Brightness, contrast, calibration and the source image still affect the result.
Compare complete quotations rather than assuming a fixed price multiplier between pitches. LED packaging, cabinet construction, service access, processing and installation can change the cost. For a broader purchasing framework, see our guide to choosing LED display pixel pitch.
What P2.5 actually means
P1.2–P2.0 provides more pixels within a limited wall area and is worth comparing for close viewing or detailed content. P2.5–P3.0 may suit larger indoor canvases when the audience and text sizes allow it. P4–P10+ provides fewer pixels per square meter and is often considered for larger displays viewed farther away.
These are starting categories, not guaranteed viewing distances or indoor/outdoor certifications. P2.5 alone cannot tell you whether a wall is suitable for a boardroom. You also need its active dimensions, actual pixel matrix and a demonstration with the intended content.
3. How to assess the calculator tool
What makes a good pixel pitch calculator
Look for explicit units, separate horizontal and vertical results, an adjustable aspect ratio and an explanation of viewing-distance assumptions. A useful tool lets you compare pitches for a known wall size and work backward from a required pixel matrix.
Check what it does not calculate. Without the dimensions and pixel matrix of a specific module or cabinet, it cannot provide a reliable bill of materials. Save the selected inputs and formulas with your project notes so results remain understandable when the interface changes.
Enter the LED Display Price calculator
The LED Pixel Pitch Calculator from LED Display Price provides screen-size, resolution and viewing-distance planning controls. During our September 29, 2026 check, its calculations were available without registration.
The site uses EagerLED branding and identifies Shenzhen EagerLED Co., Ltd. in its footer. This is an affiliated planning resource, not an independent product endorsement. Its recommendations are estimates; verify the numbers against your selected display.
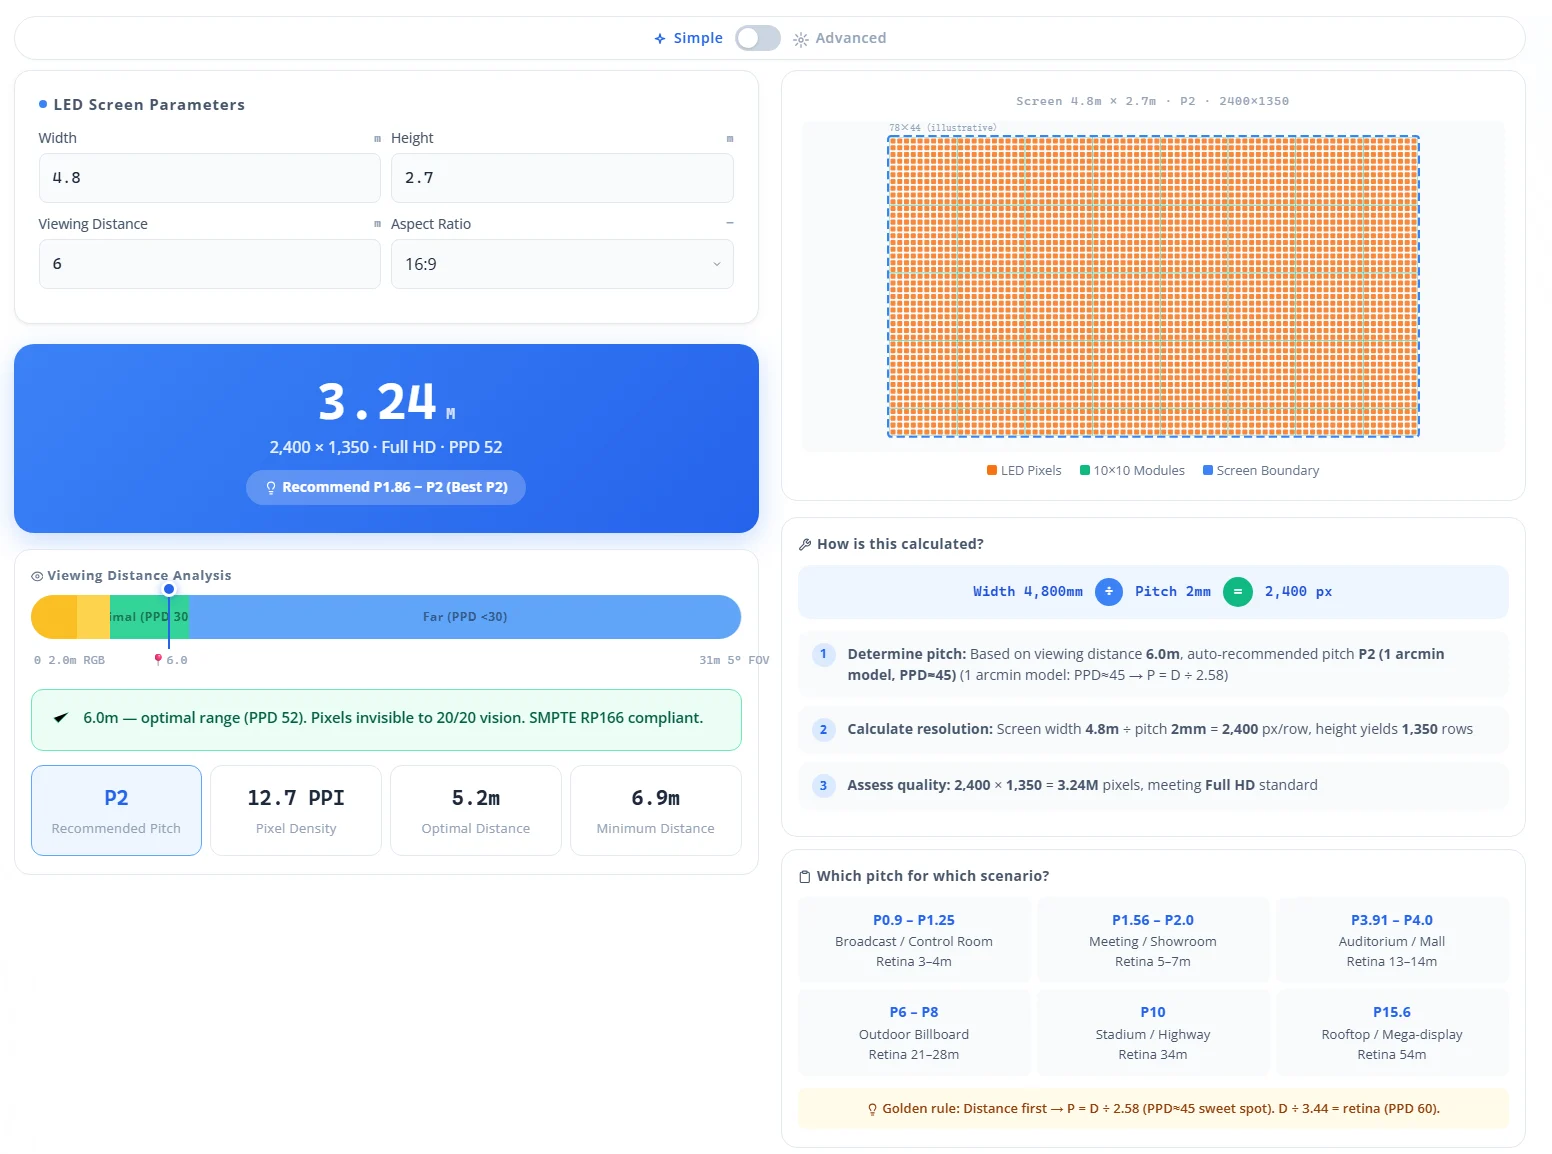
The screenshot illustrates the calculator interface. Use the live field labels and numerical pixel counts when following this guide, because presets and interface details can change.
Using the companion guide
The companion How to Use an LED Pixel Pitch Calculator — Free Tool Guide provides further explanation of the planning workflow.
Keep it beside the tool if helpful, but give priority to the units shown on the current input fields. The current screen width, height and viewing-distance inputs use meters; pixel pitch uses millimeters. Do not apply a blanket “convert everything to mm” instruction to those meter fields.
4. Step by step: how to use an LED pixel pitch calculator
Follow these five steps to produce a shortlist. The flowchart is a visual overview; the text below provides the current units, checks and limitations.

Step 1: Know your input numbers
Measure the active visible screen area, excluding trim and structure. Record width, height, the nearest practical viewing position and the farthest position where text must be legible. Note whether viewers stand, sit or move past the screen.
Also record the source format, smallest text, indoor or outdoor conditions, camera use and budget. In the current linked calculator, enter width and height in meters, pitch in millimeters and viewing distance in meters. Convert to millimeters only when doing the manual resolution formula or using a field explicitly labeled mm.
Step 2: Enter screen size or resolution
For a known wall size, set the aspect ratio first. Choose Custom if width and height are independent constraints, then enter both dimensions and the candidate pitch. A fixed ratio can change a dimension automatically, so recheck both values after editing.
For example, enter width 4, height 2.5 and pitch 2.5 for the conference-room calculation. The result should read 1,600 × 1,000 pixels. The controls update the results as you change values.
For a known resolution, use the Advanced planning area’s Resolution → Screen Size fields. Enter 1920 horizontal and 1080 vertical pixels for Full HD, then compare the physical dimensions at different pitches. The separate Distance → Pixel Pitch field provides another shortlist; check its own distance input rather than assuming it matches the main panel.
Step 3: Understand the output
Read horizontal pixels and vertical pixels first. Multiply them for total pixels, and compare both axes with your requirement. An “HD,” “FHD” or “4K” badge is only a category label; it does not establish an exact standard-format canvas.
Pixel density may appear as PPI, calculated as 25.4 ÷ pitch, or pixels per m², calculated as 1,000,000 ÷ pitch². A P2.5 grid therefore has 10.16 PPI and 160,000 pixels per m².
The visual grid labeled “10×10 Modules” is not a verified cabinet count. The tool has no project-specific module dimensions in these inputs. Ask the supplier for the module layout, exact final resolution and processor loading before ordering.
Step 4: Cross-check viewing distance
Treat distance outputs as estimates. Planar’s viewing-distance guide (PDF) distinguishes subjective comfortable viewing from a one-arcminute visual-acuity model for 20/20 vision. The latter gives distance in meters ≈ pitch in mm × 3.438.
For P2.5, that model gives about 8.6 m; it does not prove that every closer position is unacceptable. Conversely, a viewer 3 m away is not guaranteed to see a seamless image. Test the smallest text, thin lines and actual video at the nearest and farthest required positions.
Step 5: Adjust and iterate
Compare two or three candidate pitches using the same dimensions and audience positions. Record the resulting matrix, content scaling and complete installed quotation for each. If a pitch fails a hard resolution requirement, remove it or explicitly revise that requirement.
Do not increase the viewing-distance input merely to obtain a cheaper recommendation. Change it only if the real layout changes. If the budget remains insufficient, consider a smaller screen, larger text or another display configuration, then recalculate the consequences.
5. Real calculation examples (with numbers)
The following are illustrative planning scenarios. Pixel counts are calculated from nominal dimensions and pitch; a supplier must confirm the final module layout.
Example 1: Conference room LED wall
Assume a 4 × 2.5 m active wall, viewers starting at 3 m and a requirement for at least 1,920 × 1,080 pixels. The content includes presentations, conferencing and dashboards.
At P2.5: 4,000 ÷ 2.5 = 1,600 horizontal pixels, and 2,500 ÷ 2.5 = 1,000 vertical pixels. This does not meet Full HD on either axis. Accepting a 1080p signal would require scaling it down.
To meet both minimum pixel counts within these dimensions, pitch must be no larger than the smaller of 4,000 ÷ 1,920 and 2,500 ÷ 1,080: approximately 2.08 mm. Nominal P2 gives 2,000 × 1,250 pixels before module-layout checks.
The wall is 16:10, so 16:9 content needs a deliberate scaling, letterboxing or cropping plan. Neither P2 nor P2.5 guarantees comfortable dashboard reading at 3 m; demonstrate the actual text before selecting the display.
Example 2: Church stage backdrop
Assume a 6 × 4 m wall, a nearest seat 10 m away, and lyrics, sermon graphics and live camera images. If the requirement is at least Full HD, P4 is insufficient: 6,000 ÷ 4 = 1,500 pixels wide and 4,000 ÷ 4 = 1,000 tall.
P2.5 would give 2,400 × 1,600 pixels at the same theoretical dimensions. The choice still depends on available cabinets, processing, text size and cost. A lower-resolution P4 design may be acceptable for large graphics, but that would be a changed specification rather than a Full HD result.
This 3:2 wall also differs from a 16:9 source. Agree how live video and lyrics share the canvas, then test readability from the rear seats. A viewing-distance recommendation alone cannot settle those content decisions.
Example 3: Outdoor billboard
Assume an 8 × 3 m advertising screen viewed from around 30 m. Compare P8 and P10 as candidates rather than treating them as automatic recommendations.
P8 gives 1,000 × 375 pixels; P10 gives 800 × 300. Design artwork for the selected wide canvas, with text large enough to recognize during the available viewing time. A coarse pitch may work for bold graphics while failing a brief that includes small product details.
Outdoor selection also depends on ambient light, weather exposure, operating temperature and maintenance access. Test the artwork for the actual viewing conditions; distance alone does not guarantee that P10 will appear seamless.
6. Pixel pitch comparison chart
Compare density with two different viewing estimates. Application examples are starting points, not product certifications.
Pixel pitch vs. viewing distance at a glance
| Pixel Pitch | Pixels per m² | Comfort estimate (m) | Visual-acuity estimate (m) | Example applications |
|---|---|---|---|---|
| P1.2 | 694,444 | 2.06 | 4.13 | Broadcast studios, luxury retail, museum exhibits |
| P1.5 | 444,444 | 2.58 | 5.16 | High-end boardrooms, control rooms, flagship stores |
| P2.0 | 250,000 | 3.44 | 6.88 | Corporate lobbies, conference rooms, galleries |
| P2.5 | 160,000 | 4.30 | 8.60 | Auditoriums, churches, mid-size event venues |
| P3.0 | 111,111 | 5.16 | 10.31 | Large meeting halls, houses of worship, theaters |
| P4.0 | 62,500 | 6.88 | 13.75 | Large auditoriums, arenas, indoor stadiums |
| P5.0 | 40,000 | 8.60 | 17.19 | Large venues, concert backdrops |
| P6–P10 | 27,778–10,000 | 10.31–17.19 | 20.63–34.38 | Outdoor billboards, stadiums, large-scale outdoor events |
Distance columns use approximately pitch × 1.719 and pitch × 3.438, respectively; values are rounded. These follow the comfortable-viewing and visual-acuity estimates illustrated in Planar’s distance chart, with P1.2 calculated using the same factors. Comfort is subjective; neither column is a guaranteed minimum.
Indoor vs. outdoor
Select the environment rating separately from pitch. An indoor display is not made suitable for rain or direct sun simply by choosing larger pixels. Check the manufacturer’s ingress protection, operating conditions, cooling and service requirements.
Brightness should suit the actual ambient light and operating schedule, with suitable dimming. Avoid choosing from an assumed universal nit range. Indoor fine-pitch and outdoor coarse-pitch products are common categories, but outdoor fine-pitch products and other configurations also exist. Compare the actual model specifications.
What pitch for 1080p or 4K?
For a target pixel matrix, width in mm = horizontal pixels × pitch in mm; height follows the same formula. The table gives exact theoretical dimensions at the stated pitch, without rounding a minimum down.
| Target Resolution | Required Pixels (W × H) | At P2.0: Theoretical size | At P2.5: Theoretical size | At P3.0: Theoretical size |
|---|---|---|---|---|
| HD (720p) | 1280 × 720 | 2.56 m × 1.44 m | 3.20 m × 1.80 m | 3.84 m × 2.16 m |
| Full HD (1080p) | 1920 × 1080 | 3.84 m × 2.16 m | 4.80 m × 2.70 m | 5.76 m × 3.24 m |
| 4K UHD | 3840 × 2160 | 7.68 m × 4.32 m | 9.60 m × 5.40 m | 11.52 m × 6.48 m |
These dimensions describe active image area, not an orderable cabinet arrangement. If a proposed configuration is larger, it may contain additional pixels; if it is smaller, verify that it still meets both target counts. Confirm the exact pitch and module matrix because product names can use rounded pitch values.
7. How to choose the right pixel pitch
Use the calculated matrix to narrow the choice, then evaluate the complete display and content workflow.
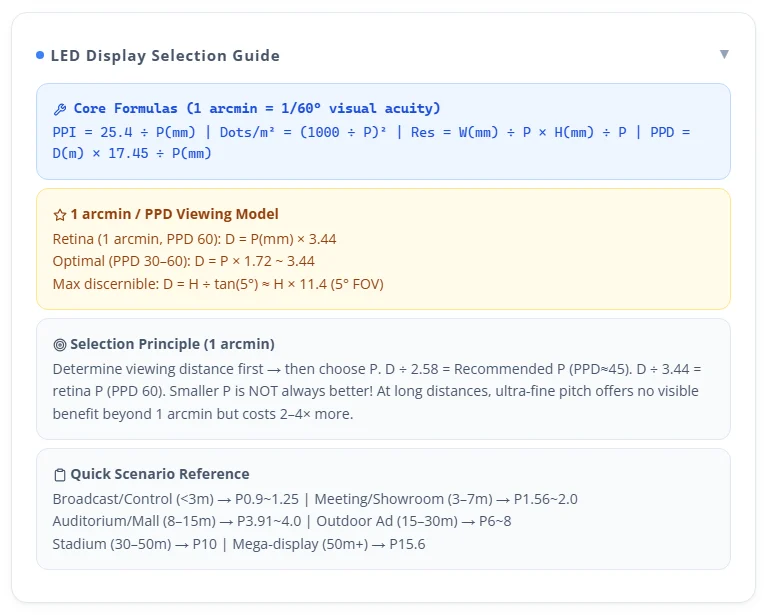
Readable formula reference: PPI = 25.4 ÷ pitch (mm); pixels per m² = (1,000 ÷ pitch)²; pixel matrix = (width in mm ÷ pitch) × (height in mm ÷ pitch). The screenshot’s pixels-per-degree estimate is distance (m) × 17.45 ÷ pitch (mm). Its suggested pitch uses distance ÷ 2.58, while the one-arcminute estimate uses distance ÷ 3.44. These are screening models, not purchase specifications. The “maximum discernible” value uses a field-of-view calculation, not a text-legibility test. The pictured 2–4× cost claim and application ranges are not verified price or suitability guarantees.
Start with your closest viewer
Measure from the nearest position where the content must be useful, not simply the room center. Include visitors approaching the screen, presenters standing beside it and staff using detailed dashboards. Also identify the farthest seat that must read text.
Use the calculator to shortlist pitches, then compare sample panels with the intended content at those positions. Record an agreed acceptance test: for example, whether a particular label or chart annotation is readable. This is more useful than a general promise that the wall will look “smooth.”
Match content type to pixel density
Text, data and thin lines need enough physical pixels to retain their shape after scaling. Large video imagery may remain useful on a lower-resolution canvas, but moving images do not eliminate visible pixel structure. Evaluate the actual content rather than relying on the application name.
For camera use, test the complete camera and display setup for artifacts as well as resolution. For mixed content, use the most demanding routine material in the demonstration. Our screen aspect ratio guide explains another constraint when fitting source material to a custom LED canvas.
Budget reality check
Request comparable quotations for the shortlisted configurations. Keep screen area, service access, brightness requirements, installation scope and warranty terms consistent. Include control equipment, spares, transport and commissioning so a panel-only price does not hide a larger project cost.
There is no verified universal percentage saving between P2.5 and P4. Nor can this guide promise that every viewer will see no difference at a specified distance. Choose the coarsest pitch that passes the agreed content and viewing tests while meeting the required pixel matrix.
The 3-question shortcut
First, where are the closest and farthest viewers who must understand the content? Use measured positions to generate a distance-based shortlist, then test it.
Second, what must the wall display? Write down the minimum pixel matrix, smallest text and source aspect ratio. A resolution requirement can rule out a pitch even when its viewing-distance estimate seems suitable.
Third, what is the complete installed budget? Compare feasible configurations against it. If none fits, revise the real project constraints with the stakeholders rather than changing calculator inputs to hide the mismatch.
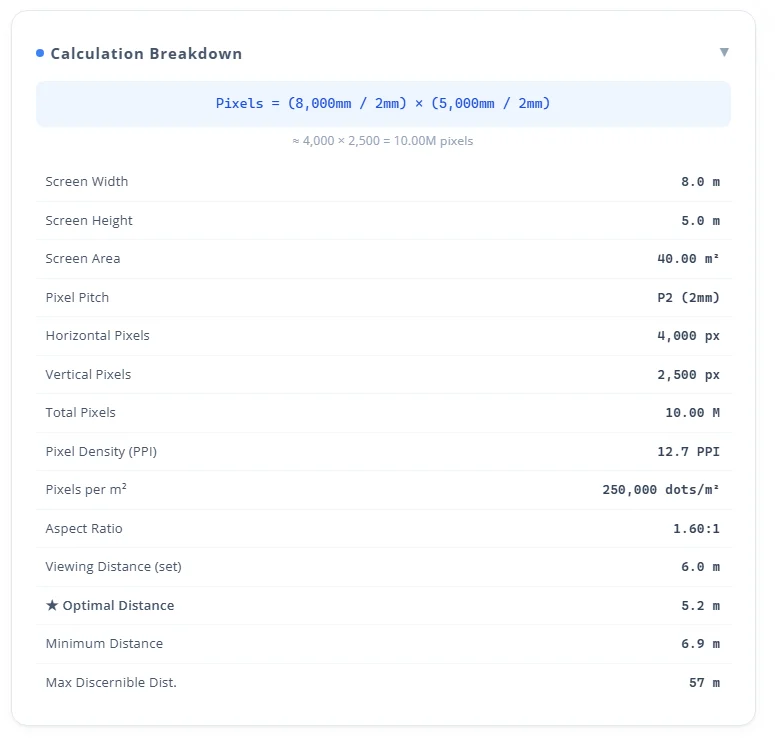
The example image above shows an 8 × 5 m P2 wall: 8,000 ÷ 2 = 4,000 pixels wide and 5,000 ÷ 2 = 2,500 pixels tall, totaling 10 million pixels over 40 m². Density is 12.7 PPI or 250,000 pixels per m²; the aspect ratio is 1.6:1. Its 6 m viewing input and 5.2 m “optimal” output are different quantities. The displayed 6.9 m acuity estimate and 57 m field-of-view estimate are not universal readability limits.
8. Common mistakes when using a pixel pitch calculator
These checks help catch mismatches between a calculator result and a buildable display.
Forgetting to convert meters to millimeters
Match the field label instead of converting every input automatically. One meter equals 1,000 millimeters. Entering 4,000 into a width field labeled m means four kilometers, not a four-meter wall.
The linked calculator currently expects screen dimensions in meters and pitch in millimeters. For manual division, convert the dimensions: a 4 m width becomes 4,000 mm, then divide by pitch in mm. If a result looks implausible, check units and whether a fixed aspect ratio changed the height.
Confusing screen resolution with pixel pitch
P2.5 does not mean 2.5 megapixels. Full HD is a 1,920 × 1,080 pixel matrix, while pitch is physical spacing. A nominal P2.5 screen measuring 4.8 × 2.7 m has that matrix; 4.8 m width alone does not establish its height or resolution.
Also distinguish input compatibility from native display resolution. A processor may accept a 4K source and scale it to a much smaller LED canvas. Ask for the final horizontal and vertical pixel counts, not just a supported-input label.
Ignoring module size constraints
A calculated width of 4,123 mm does not mean you can order that exact width. Suppose the selected module is 320 mm wide. Twelve modules span 3,840 mm; thirteen span 4,160 mm. The latter exceeds a hard 4,123 mm space limit even before allowing for structure.
Use the actual product’s module or cabinet dimensions and pixel matrix. Check height in the same way, allow installation and service clearances, and recalculate the final resolution. Neither rounding up nor rounding down is automatically correct: one can exceed the available space, while the other can miss the required pixel count.
Picking the smallest pitch “just to be safe”
A finer pitch can be justified by close viewing, small text or a required pixel matrix, but uncertainty alone is a poor specification. It adds pixels that the rest of the system must support, and the benefit should be demonstrated.
Resolve unknowns with a site measurement and content test. Conversely, do not reject finer pitch because a simple distance rule says it offers no benefit. The calculator is a screening tool; the final choice must meet the actual brief and the audience’s expectations.
9. Conclusion
Use the LED Pixel Pitch Calculator to compare physical size, pixel pitch and resolution with consistent units. Keep both pixel dimensions visible: the 4 × 2.5 m P2.5 example is 1,600 × 1,000, so it cannot satisfy a native Full HD requirement.
Treat viewing-distance recommendations as estimates and test the intended content at real audience positions. Then ask the supplier to confirm the cabinet layout, exact matrix, processing capacity, service access and complete quotation.
The How to Use guide can help you revisit the workflow. Bring the saved inputs, calculated outputs and content requirements to the discussion so the final specification can be checked and reproduced.
 Novastar H15 In-Depth Review: Specs, Real-World Performance, and Setup
 Novastar TU4K Pro Guide: The All-in-One LED Controller
Related Posts

Fill In Your Needs In Detail
Fill in the screen usage scene and size you need in “Content”.You will get a quote.