Novastar Viplex Express is a free Windows-based LED control software designed to create, schedule, publish, and manage content on LED screens. If you want to download the latest version or don’t know exactly how to install and setup the Viplex Express software, this user guide will be a good helper to iron out all problems during the process, helping you get started quickly and accurately. No fluff. Let’s check them out!
1. What is Novastar ViPlex Express?
Novastar ViPlex Express is a professional window-based LED content management software that allows you to create, publish, schedule, and manage display content via PC. It works with NovaStar multimedia players and supports videos, images, text, clocks, weather information, and other media.
ViPlex Express comes with two working modes: studio mode and async mode. Studio mode is real-time playback, and async mode means standalone playback. Reading on. You will get more information about them.
NovaStar ViPlex Express software is an upgraded version of Novastudio. Compared with the old synchronization playback software, ViPlex Express features more prominent advantages for LED display content configurations, covering:
- Synchronous and asynchronous workflows
- Playlist creation and scheduling
- Content publishing to multimedia players
- Multi-terminal management
- Device monitoring and playback logs
- A simplified editing interface
In addition, It supports brightness scheduling, device management, and binding terminals to the VNNOX cloud platform for remote monitoring and OTA firmware updates.
2. Latest ViPlex Express Software and Manual Free Download
Below are both the latest and full-featured releases of ViPlex Express, all available for free download. No extra steps are needed — simply download them directly.
2.1 Latest ViPlex Express for Windows — V4.1.1
The latest official Windows version is ViPlex Express V4.1.1.0201.
Note: This edition is not compatible with Win7, but with Win 10/11 64-bit. Meanwhile, Viplex Express V3.0.5 can’t open projects saved by V4.0.0/V4.1.1.
2.2 Previous Versions of ViPlex Express Software for Windows
Here are some previous versions of NovaStar ViPlex Express for async mode and sync mode, incorporating V4.0.0, V3.0.5, V3.0.4, V3.0.0, V2.26.0, and V2.3.0.
2.3 ViPlex Express Software User Manual(Selected Previous Versions)
2.4 ViPlex Handy App Download for Mobiles
ViPlex Handy is a mobile version of ViPlex Express software, aiming to adjust the LED content quickly and simply through phones.
You can also directly scan the QR code to download Novastar Viplex Handy (QR code from Novastar Official Website). So feel free to download it.

In addition to downloading all resources for ViPlex Express and ViPlex Handy directly above, you can also come to Novastar’s official website to obtain the latest files that you want.
3. Key Functions of Novastar ViPlex Express Software?
Novastar ViPlex Express software features seven main functions, including content creation, playlist management, scheduling, content publishing, terminal control, monitoring and logs, and USB playback. Below, we will elaborate on each function.
3.1 Content Creation
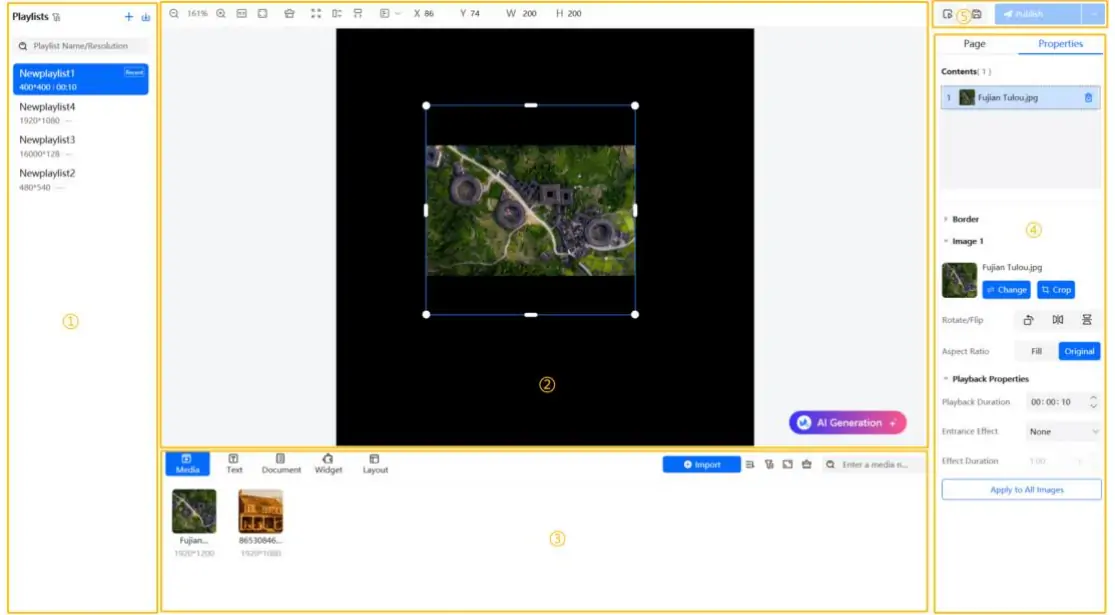
Create screen content in a visual editing workspace. When a target terminal is selected, ViPlex Express can use its screen resolution as the editing-canvas size.
- Add videos, images, text, clocks, timers, weather, web pages, documents, and streaming media.
- Start with a preset page template or create a custom multi-window layout.
- Set the position, size, layer order, playback duration, and playback properties of each item.
- Preview the content before publishing it to the display.
3.2 Playlist Management
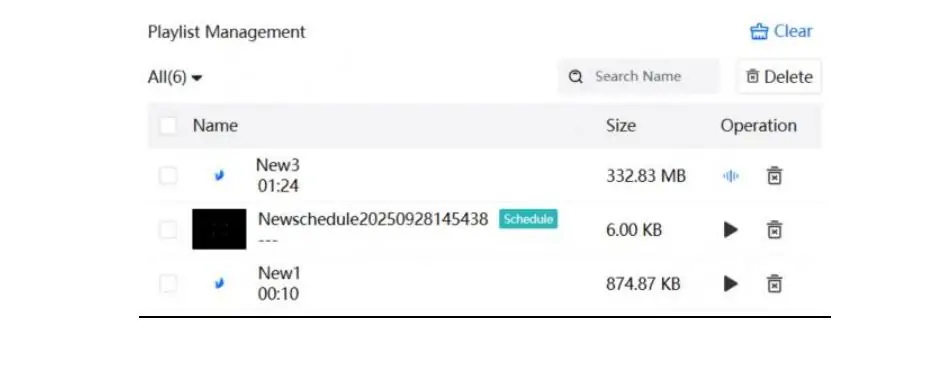
Use playlists to organize pages and define their playback order:
- Create a playlist and set its resolution.
- Add one or more pages and media items.
- Arrange the pages in the required playback sequence.
- Save, copy, import, export, or delete the playlist as required.
A published playlist can also be read back from a connected player for editing or reuse. Some earlier ViPlex Express versions and manuals use the term solution for this type of content package.
3.3 Scheduling
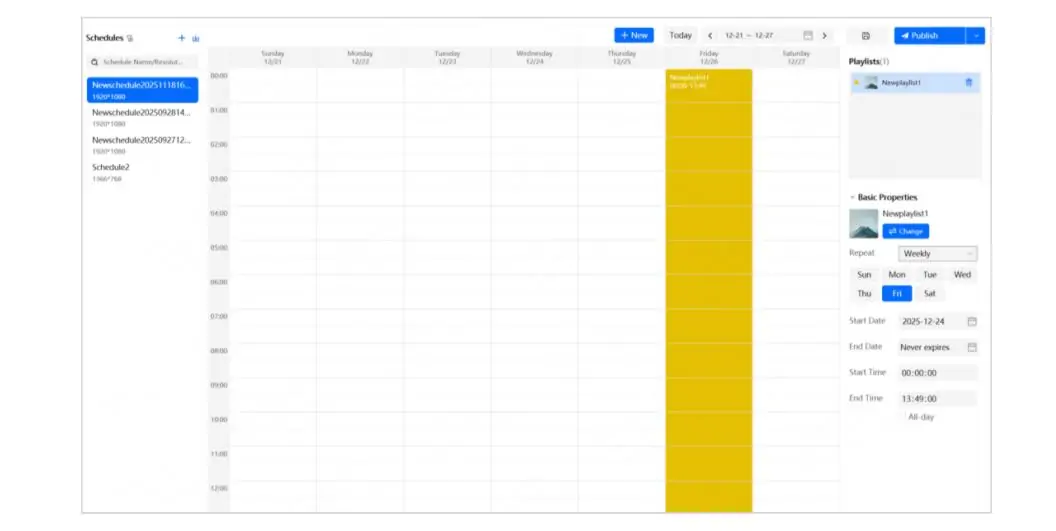
Schedules control when specific playlists are shown.
Schedules can be edited, copied, imported, exported, and published to supported players.
3.4 Content Publishing
Publishing transfers a playlist or schedule from Novastar ViPlex Express to one or more connected players.
Step 1 – Select content. Choose the playlist or schedule to be published.
Step 2 – Select screens. Choose a single screen or multiple compatible screens for batch publishing.
Step 3 – Check the result. View transfer progress and publishing results in the Publishing Center.
3.5 Terminal Control
3.5.1 Device Connection
Refresh the device list or search for a player by IP address. After login, users can rename the terminal, change its password, or clear a stored login password.
3.5.2 Network
Configure Ethernet, Wi-Fi, and 4G settings when supported. For a direct Ethernet connection, the DHCP service can help assign network parameters to the player.
3.5.3 Display and Playback
Adjust brightness, color temperature, volume, screen power, time synchronization, playback settings, and video sources.
3.5.4 Maintenance
View terminal information and perform supported firmware updates.
3.6 Monitoring and Logs
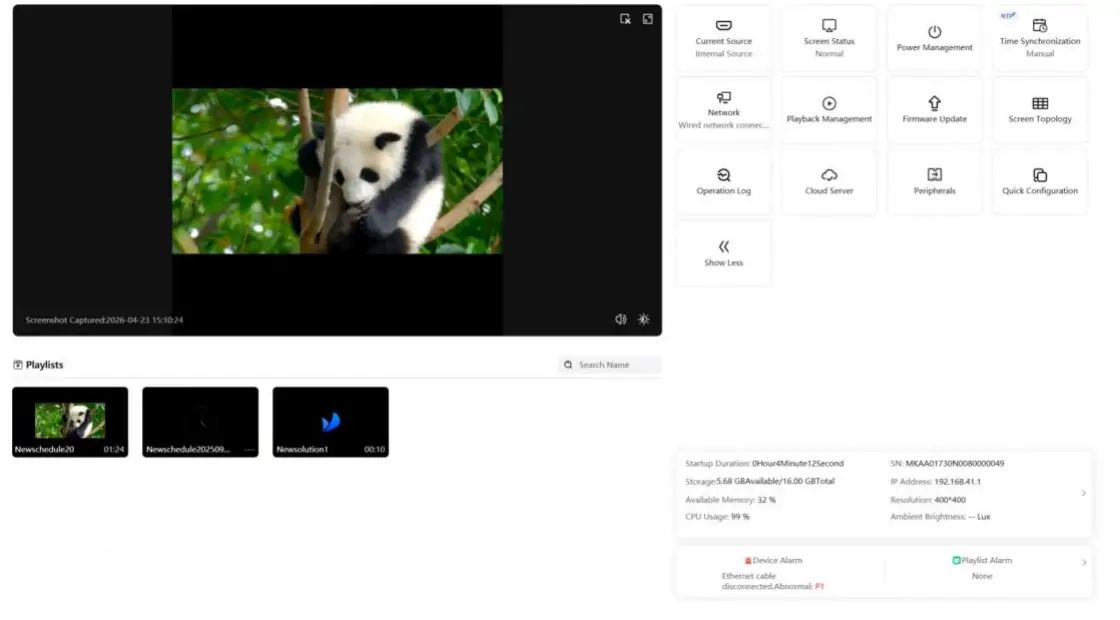
ViPlex Express displays terminal status and records operations for troubleshooting and maintenance.
- Total shows the number of detected or added terminals.
- Online means the terminal is connected and logged in.
- Not Login means the terminal has been detected but authentication is not complete.
- Offline means the terminal is not currently reachable; check its power and network connection.
- Device Status shows storage, memory, IP address, and screen information.
- Alarms identify active device or playback problems.
- Operation Logs record user actions and terminal events for later review.
3.7 USB Playback
USB Playback allows content to be delivered when the player cannot be reached over a network.
The export process uses the player login password to verify the USB playback file.
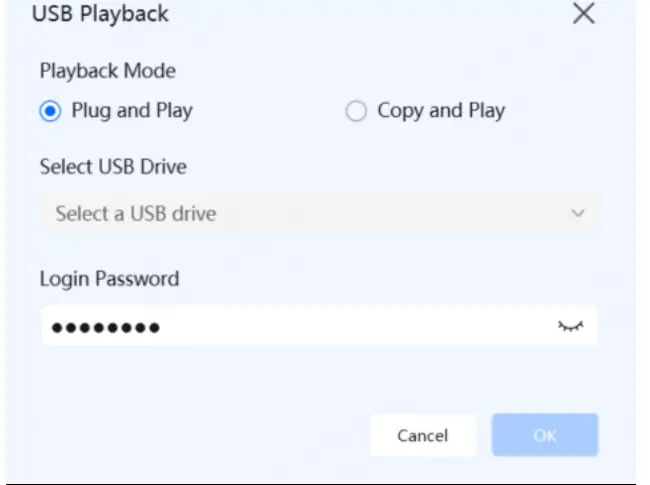
Compared with similar control software like HDPlayer or PlayerMaster, ViPlex Express LED display software offers more comprehensive functions to help users edit, control, schedule, and manage screen content. Then we will further tap into what Studio mode and Async mode are, and how to export content to a multimedia player using USB Playback.
4. Two Modes of ViPlex Express: Studio Mode vs Async Mode
The main difference between Studio mode and Async mode is how they render and play the content on LED/LCD displays. There are two modes that will appear in a dialog box when you open NovaStar Viplex Express. The following content will be divided into three main parts: definitions, quick comparison, and how to choose. Let’s get started!
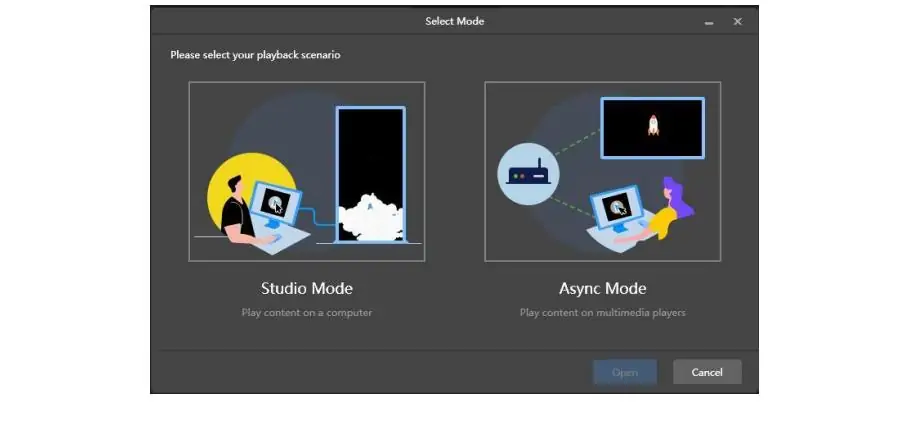
Note: The working modes of V4.1.1 ViPlex Express Software are Demo Mode and Async Mode. Demo mode lets users create virtual screens and publish playlist, tailored for demonstrations or testing scenarios.
Attention: The new versions of Novastar Viplex Express ((V4.x version) only support Async Mode. Old versions (V3.x or earlier) support Studio Mode and Async Mode.
4.1 What Are They?
4.1.1 Studio Mode
In simple terms, studio mode is a synchronous playback mode in ViPlex Express LED Display Software, displaying content directly from PC to LED or LCD displays in real time. During this process, the PC functions as a real-time video source.
Steps to Set Studio Mode on V3.0.5 ViPlex Express:
Note: V4.1.1 and V4.0.0 support Async mode only. If you want to use Studio mode, V3.0.5 is the right call.
- Open ViPlex Express Software.
- On first launch, select Studio Mode in the mode-selection dialog. If the software is already open, use the top-right menu → Working Mode → Studio Mode.
- Click OK and restart ViPlex Express.
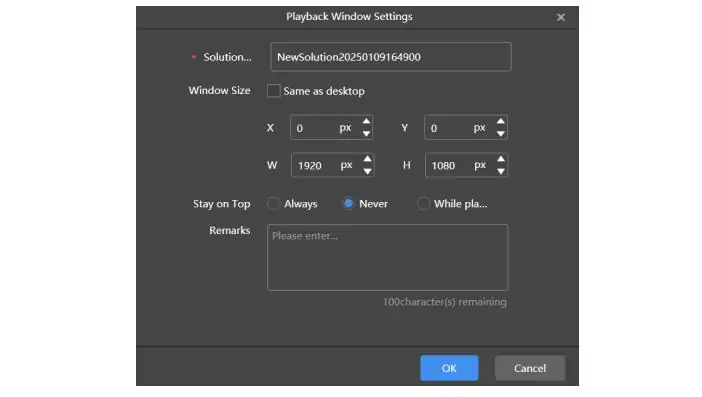
- Open Playback Window → Playback Window Settings. Set the window’s width, height, and position to match your LED display area.
- Create a solution, add videos, images, or text, and arrange the layout.
- Save the solution and click Play. Keep the PC running during playback.
4.1.2 Async Mode
Async mode means that the content is uploaded and stored in multimedia players (Novastar Taurus Series) previously via the PC. The player can display content independently without relying on PC connections. So the PC serves as a content transmission tool.
Steps to Set Async Mode:
- Select Async Mode via the top-right menu → Working Mode, then restart. V4.x uses it by default.
- Connect the PC and player via LAN or the player’s Wi-Fi.
- Log in using the player’s password.
- Create a solution or playlist matching the screen’s resolution.
- Add media and adjust the layout and timing.
- Preview and save, then Publish to the player.
4.2 Studio Mode vs Async Mode: Quick Comparison
4.3 When to Choose Studio Mode or Async Mode
Studio mode fits applications requiring real-time playback and direct control. It is suitable for live events, conference rooms, and on-site presentations that need frequent content changes.
Choose Async Mode for retail screens, outdoor advertising, and scheduled digital signage that must run independently. It can be used for long-term and unattended operation.
Below is a tutorial video on how to switch between Asyn Mode and Sync Mode.
5. Novastar ViPlex Express USB Playback: Plug and Play,Copy and Play
USB playback is a control method belonging to Async Mode, which mainly solves the problems of no network and Wi-Fi, allowing you to export the solution to a USB drive and insert the drive into the player to load content. There are two playback methods for choice: plug and play, copy and play.
Plug and Play: The player plays content directly from the USB drive. Keep the drive inserted throughout playback. Choose this option for temporary content, demonstrations, or short events.
Copy and Play: The player copies content from the USB drive to its internal storage, then plays it independently. Remove the drive only after copying is complete. Choose this option for permanent installations and routine advertising updates.
Three Conditions Where You Can’t Choose the USB Playback Method:
- Ultra-long Programs
- Require Frequent Remote Content Updates
- Studio Mode Live Playback Scenarios
5.1 How to Set Up USB Playback
- Create and save your solution or playlist in Async Mode.
- Insert a USB drive into your PC.
- Open USB Playback for the selected solution or playlist.
- Select Plug and Play or Copy and Play on the pop-up window.
- Select the USB drive as the export location and enter the player password if requested.
- Click OK to start exporting files to the USB drive.
- 7. Safely eject the drive and insert it into the multimedia player.
- 8. Wait for playback or copying to finish, depending on the selected method.
Note: Choosing the ‘Copy and Play’ mode should configure these options:
- Solution saving policy
- Save location
- Terminal password
6. How to Use ViPlex Express? Step-by-Step Guide
This step-by-step guide will teach you how to use ViPlex Express Software in Studio Mode(for V3.0.5) and Async Mode(for V4.1.1/V4.0.0), including ViPlex Express setup preparations, detailed steps, and precautions. Here we go.
Preparations before Using ViPlex Express:
- Install the right version of novastar viplex express
- Hardware Confirmation: Use sending card(Studio Mode) or Taurus multimedia player(Async Mode)
- Network Setting:
In Async Mode, you should ensure the PC and player in the same LAN.
In Studio Mode, connect the network cable with sending card.
6.1 How to Use ViPlex Express in Async Mode?
Compatible with: Taurus Player; play off the computer after uploading.
LAN Setup: Connect the PC and the player to the same router, then power on the player.
Search for Devices: Open Novastar ViPlex Express — nearby players are detected automatically under My Screens; if yours is missing, click + Add Screen, chooseIP address or IP Range, then click Search.
Log In: Right-click the player and select Log In. Default account is admin, and the default password is printed on the SSID label of the device.
Create a New Playlist: Select the screen, click Playlist, then click +. The playlist resolution should match the screen resolution.
Edit Playlist: Add images, videos, Text widgets, and clock widgets; set the Number of Plays per page, and arrange pages from top to bottom.
Schedule (Optional): Click Schedule → + to set the repeat interval, playback date, start time and end time for scheduled playback.
Preview: Click the preview icon in the top-right corner to confirm the visual output (press Esc to exit).
Publish and Upload: Click Save, then Publish — or Batch Publish for multiple screens — to upload the playlist to the player’s storage.
Playback Verification: Once the upload finishes, the player plays according to its schedule automatically; at this point you can shut down the computer.
Key Takeaway: The computer is used only for editing and uploading; the player handles storage and playback
6.2 How to Use ViPlex Express in Studio Mode?
Compatible with: Sending card / controller (e.g., MCTRL4K) or LCD; PC stays connected as the live video source.
Version: Available in V3.x and earlier only — removed from V4.0.0 onward
Hardware Setup: Connect the PC to the sending card, and the controller to the LED display.
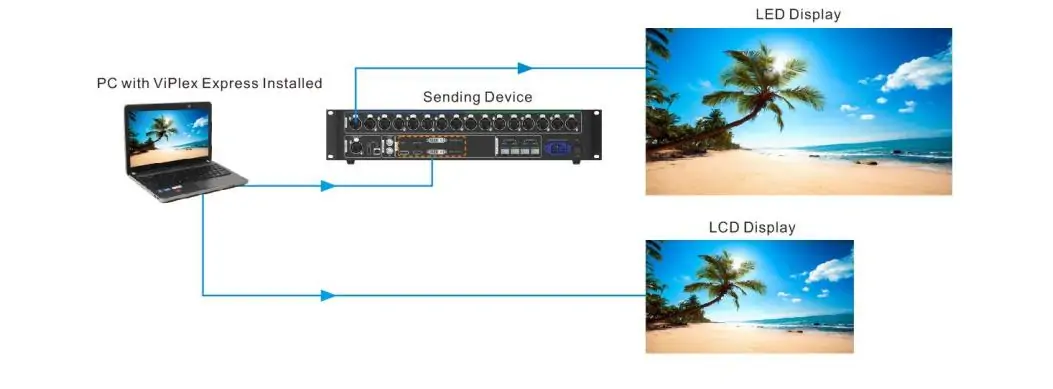
Select Working Mode: Choose Studio Mode in the Select Mode dialog on first launch, or switch via Working Mode → Studio Mode and restart.
Create a New Solution: Click New, select Regular Screen or Ultra Long Screen, then set the resolution.
Set Playback Window: Playback Window → Playback Window Settings — set the coordinates, width and height to match your screen.
Edit Solution: Add images, videos, text and clock widgets; set page order and Number of Plays.
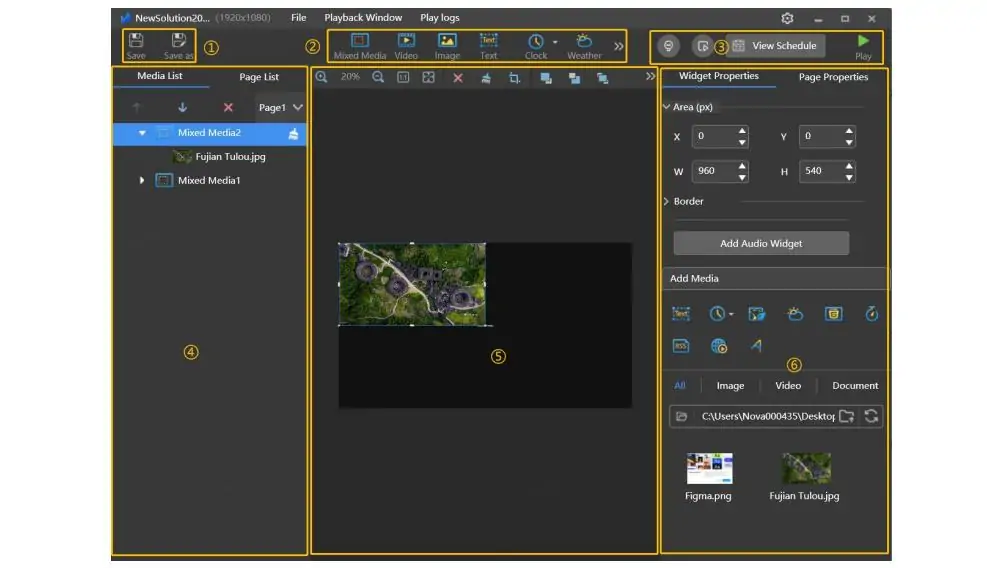
Preview: Click the preview icon at the upper right to confirm the visual output
Start Playback: Click Play — the editing page is replaced by a playback control bar (pause / stop / restart).
Optional: Enable Start playback in Preferences to auto-play the last solution on Windows startup; use Ctrl + letter to show or hide the playback window.
Key Takeaway: The PC drives the screen in real time and must stay connected; for standalone scheduled playback, use Async Mode.
7. How to Use ViPlex Handy? Step-by-Step Guide
ViPlex Handy is a mobile app of Novastar ViPlex Express to control LED screen. It enables users to edit and publish solutions to Taurus players wirelessly from smartphones. It supports VNNOX cloud management to control and publish content.
Step 1: Wi-Fi Preparation
Power on the Taurus player. Connect your mobile phone to the same local Wi-Fi router as the player, or connect directly to the player’s built-in Wi-Fi AP.
Step 2: Launch ViPlex Handy V6.0.0 & Discover Terminals
Open the ViPlex Handy app. Swipe down to refresh the device list to scan Taurus players on the network.
V6.0.0 New Feature: Tap the QR code icon to scan the QR code on the player for quick login.
Step 3: Connect and Log in to the Terminal
Tap ‘Connect’ next to your target Taurus player. Enter admin credentials (default: admin/123456), or use QR code login. Confirm the device shows ‘Online’.
Optional: Rename the player, adjust screen brightness, sync device time in terminal management.
Step 4: Create a New Program
Tap ‘New Program’. Set the screen resolution matching your LED panel.
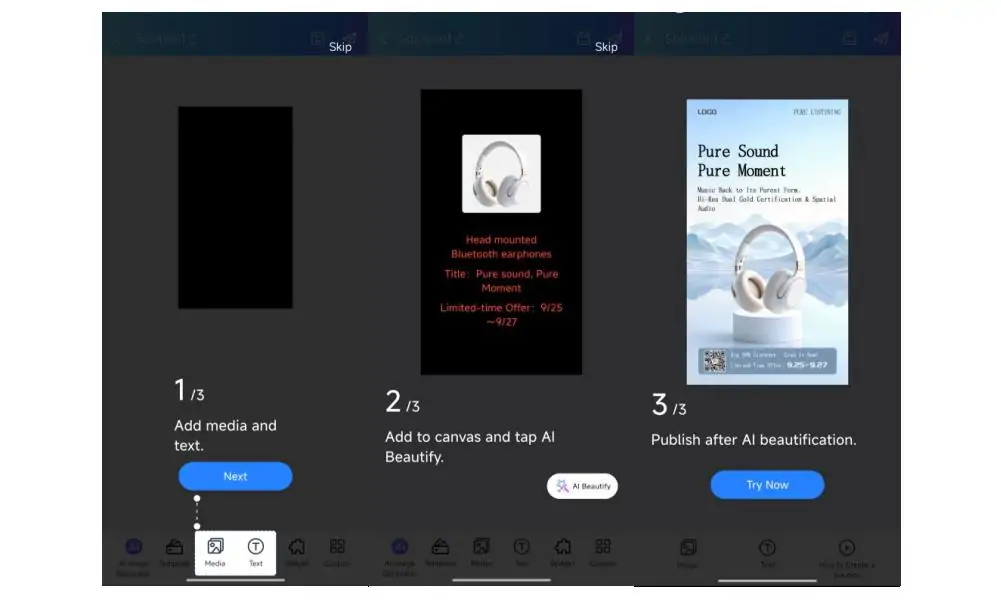
Step 5: Edit Program Content
Add media: images, videos, scrolling text, clock components.
Set playback duration, loop count, scheduled active time periods.
V6.0.0 New: Text sharpening function to improve text display clarity on LED screens.
Step 6: Preview Program
Preview the content on the mobile screen, check for cropped images or misaligned text.
Step 7: Publish and Upload to Player
Tap ‘Publish’. Select the online Taurus terminal. Upload the program to the player’s storage.
V6.0.0 optimized batch publishing performance.
Step 8: Verify Playback
After upload completes, the Taurus player will play content automatically according to schedule. You can disconnect your phone Wi-Fi.
Optional Step: Save / Cloud Sync
Save your program locally on the phone, or bind the device to VNNOX cloud for remote release over the internet.
8. Novastar ViPlex Express vs Huidu HDPlayer: Which One Should You Choose
I can tell you exactly that it primarily depends on the brand and model of the LED controller or multimedia player used with your LED displays and your projects. Huidu HDPlayer is Windows-based LED content management software developed by Huidu Technology. Its functions are the same as the Novastar Viplex Express, including content creation and editing, scheduled playback, program publication, and remote management.
Next, we will compare Viplex Express Software with Huidu HDPlayer in terms of their strengths, limitations, and Cloud remote access, telling you which is the best choice for you.
8.1 Novastar ViPlex Express
- Old versions support studio mode and async mode.
- Supports LAN, Wi‑Fi and 4G content publishing.
- Integrates with VNNOX cloud platform for remote multi-screen management.
- Strength: Stable for large projects, rental LED screens and high-brightness outdoor displays.
- Limitation: Only compatible with NovaStar Taurus players and NovaStar receiving cards.
8.2 Huidu HDPlayer
- No native studio sync mode like Novastar ViPlex Express.
- Supports multi-zone layout, playlist scheduling, brightness adjustment and multi-terminal management.
- Strength: Lower overall hardware cost, lightweight software, simple workflow, ideal for small indoor advertising LED screens.
- Limitation: Cloud remote system and large-scale cluster management are less powerful than NovaStar’s solution.
8.3 Comparison Table
9. FAQs
10. Conclusion
Novastar Viplex Express Software is a professional content control system, helping you manage, calibrate, edit, and schedule the screen content quickly and easily. VNNOX cloud platform also supports remote monitoring, operation, and maintenance.
This article has delved into Novastar Viplex Express file download, key working modes, USB playback, and detailed steps on Viplex Express and Viplex Handy. The information offered is all new and refers to the latest resources. So this guide will be a good assistant to solve your issues.
If you want to download other related files, go to the Novastar software download page to get user manuals, firmware, and controller specifications you need.
 COB vs GOB LED: Which Packaging Method Fits?
Related Posts

Fill In Your Needs In Detail
Fill in the screen usage scene and size you need in “Content”.You will get a quote.