Configuring your LED screen via NovaLCT may feel overwhelming for new operators. However, you can finish configuring your LED displays within 20 minutes by following the right steps offered below.
This guide covers the full NovaLCT screen configuration steps, from computer connections, screen configuration, sending card settings, display testing, and hardware settings.
You can also locate the latest NovaLCT software (NovaLCT V5.9.2) download resources at the bottom of this article.
1. What is NovaStar NovaLCT?
NovaLCT is NovaStar’s Windows tool for setting up compatible LED screens. Use it to configure receiving cards and arrange cabinets on the screen map.
The video source supplies the picture. NovaLCT tells the hardware how to display it.
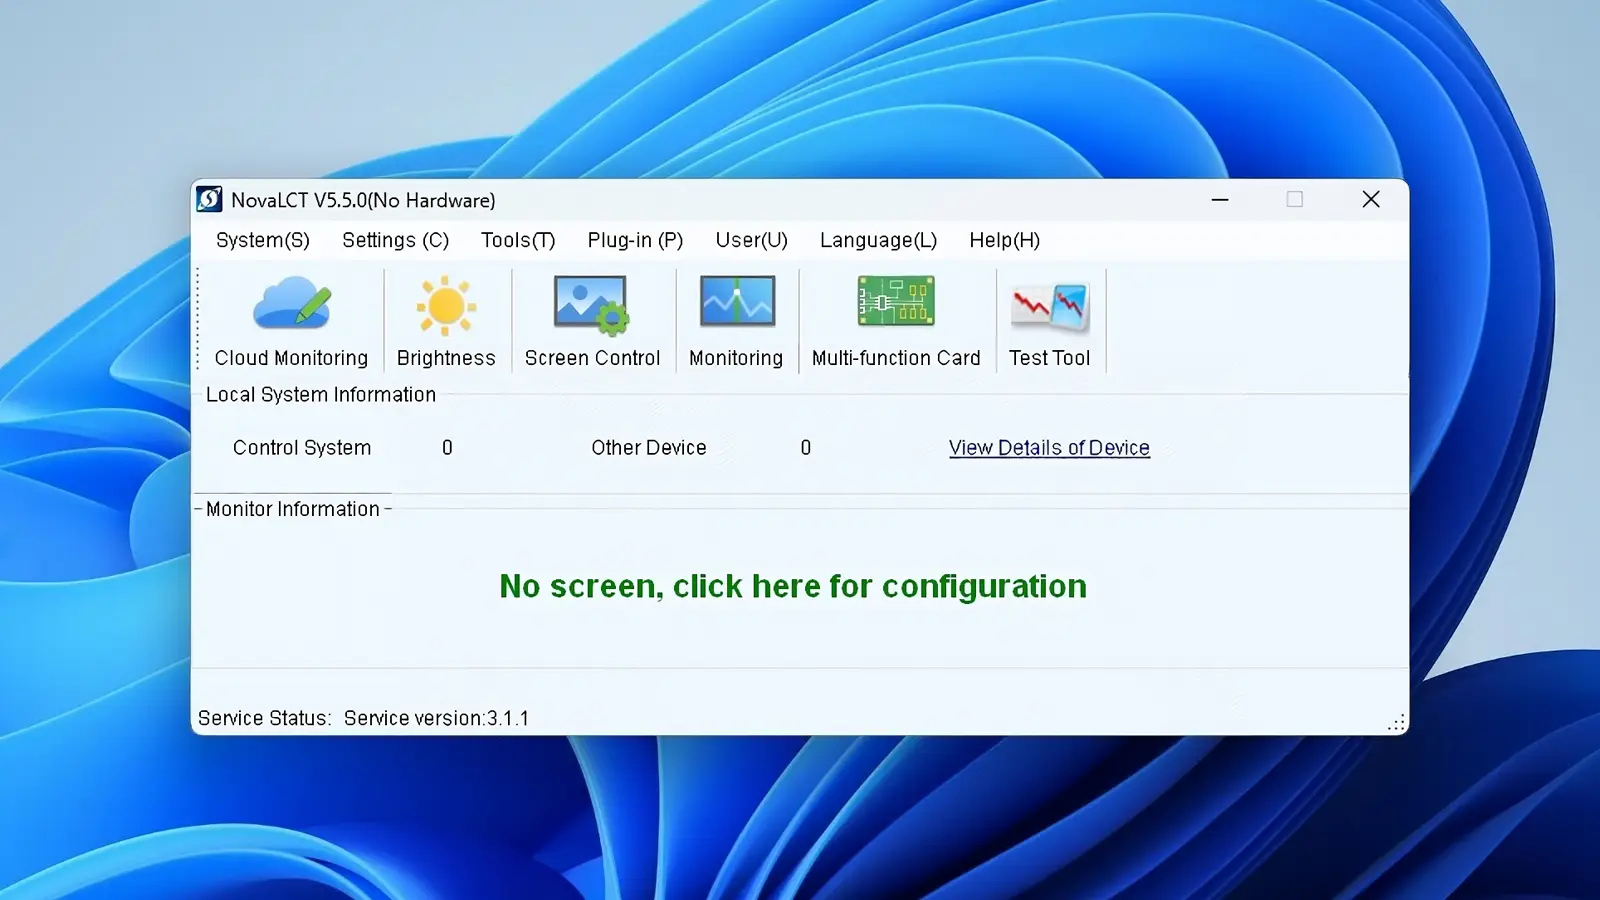
1.1 Main Features and Functions
Key features and functions include:
- Screen configuration: Set up sending cards and receiving-card parameters.
- Cabinet mapping: Arrange cabinets to match the physical cable connections.
- Brightness adjustment: Adjust screen brightness and supported color settings.
- Display calibration: Apply calibration data on compatible hardware.
- System monitoring: Check supported hardware status and communication errors.
- Configuration backup: Save and restore receiving-card settings and screen layouts.
Available functions depend on the connected hardware and firmware.
1.2 Supported Controllers and Receiving Cards
Read the full model numbers on the controller and receiving card. Check both against the supported hardware for your software release.
Keep suffixes such as Pro, Plus, and N in your notes. An MRV416-N label identifies the receiving card; record the controller model separately.
2. NovaLCT V5.9.2 Software and Previous Versions Download
Choose the Windows version specified for your LED screen. For the latest NovaLCT V5.9.2, select the manual for your control system: live video or multimedia player.
2.1 How to Find the Latest NovaLCT Software Download
On NovaStar’s official website, select Software, then find NovaLCT. Check the full version number before downloading.
Keep the installer with the project files so another technician can use the same version.
2.2 Novastar NovaLCT V5.9.2 Software Download
Extract the V5.9.2 package before running the installer. When NovaLCT opens, check that it shows NovaLCT V5.9.2.
Read the release notes before connecting a working screen, especially if you are replacing an older installation.
2.3 Previous Versions: V5.6.1, V5.4.4.6, V5.4.0, V5.3.1, and V5.3.0
Use an older installer when you need to reproduce a working setup. Match the entire version number: V5.4.4.6 and V5.4.0 are different builds.
Note: You can go to our Novastar download page to get more files on various Novastar controllers.
2.4 User Manuals, Drivers, and Release Notes
For a live video input, use the Synchronous Control System manual. For a screen driven by a multimedia player, use the Multimedia Player manual.
The release notes explain what changed. A communication driver helps the PC detect hardware; receiving-card firmware runs on the card itself.
2.5 NovaLCT V5.9.2 Compatibility
NovaLCT V5.9.2 Supported Controllers:
- Synchronous sending controllers: MCTRL300, MCTRL R5, MCTRL500, MCTRL600, MCTRL660, MCTRL700, MCTRL4K, MCTRL660 PRO
- Video controllers: NovaPro UHD, NovaPro UHD Jr, VX4S-N, VX16s, VX1000, K4S-N, VX400S, VS1, VS2, VS3, VS7, H series, C1, N9, J6
- Multimedia players: TB1, TB2, TB3, TB4, TB6, TB8, TB30, TB40, TB50, TB60, JT100, JT50, TCC70, JT200, JT20, AD20
Important Notes: NovaLCT runs on Windows 7 and newer Windows operating systems only.
3. NovaLCT Installation and System Requirements
Install Nova LCT software on a supported 64-bit Windows PC. Check that it detects the powered controller before loading any cabinet settings.
3.1 NovaLCT Download for Windows
The V5.9.2 manual lists 64-bit Windows 7, a fifth-generation Core i3, and 4 GB of RAM as minimums.
NovaStar recommends 64-bit Windows 10 or later, a tenth-generation Core i5 or better, and at least 8 GB of RAM. Test the intended USB or network connection before going onsite.
3.2 How to Install NovaLCT and Required Drivers
- Download the selected release from a verified source and extract the archive into a local folder.
- Run the installer using the permissions required by your organization and follow the setup prompts.
- Install the appropriate communication driver when required by the package or controller documentation.
- Open Novastar NovaLCT, check its version, connect one powered controller, and confirm detection before configuring the screen.
If the installer is blocked, have the package and alert checked before continuing. Record the driver version alongside the NovaLCT version.
3.3 NovaLCT Download for Mac: Compatibility and Options
Novastar NovaLCT has no native Mac installer in the download catalog. Use a supported Windows PC when your screen requires NovaLCT.
SmartLCT has a Mac edition for certain devices. Check your controller model before choosing it.
3.4 What to Back Up Before Upgrading
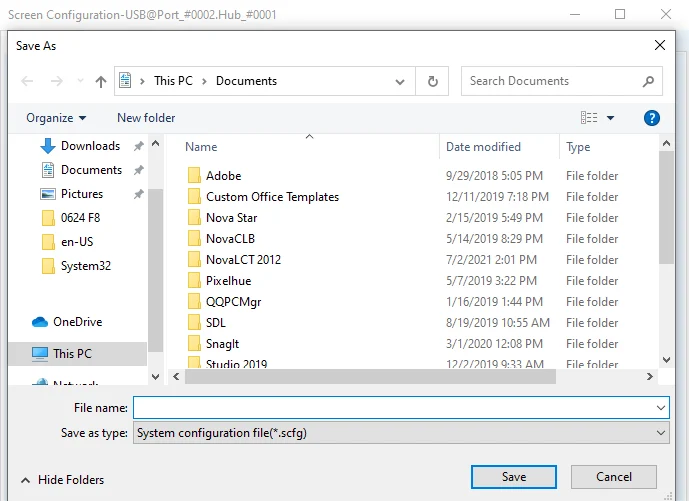
Save the receiving-card file and the screen connection file in a dated project folder. Keep the last working copy untouched.
Photograph the cable route as well. A photo helps you trace the wiring, but you need the configuration files to restore the screen.
| Record | What it protects | Practical check |
|---|---|---|
| Approved receiving-card files | Module and cabinet parameters | Label each file by cabinet revision |
| Screen connection or project files | Cabinet positions and port routing | Compare with a cable-route drawing |
| Calibration data, where applicable | Previously accepted visual uniformity | Keep original data before adjustment |
| Software and firmware versions | Reproduction of the working environment | Record exact model suffixes and versions |
| Photographs and test results | Evidence of wiring and accepted behavior | Include restart and source-change checks |
4. NovaLCT Screen Configuration: 8 Key Steps
Test the cabinet settings first, then map the screen. Once every cabinet shows the correct part of a numbered grid, save the settings to hardware.
These steps cover a synchronous controller and a regular cabinet layout. Mark the first cabinet on each output port before opening the screen map.
4.1 Prepare the Hardware and Connect Your Computer
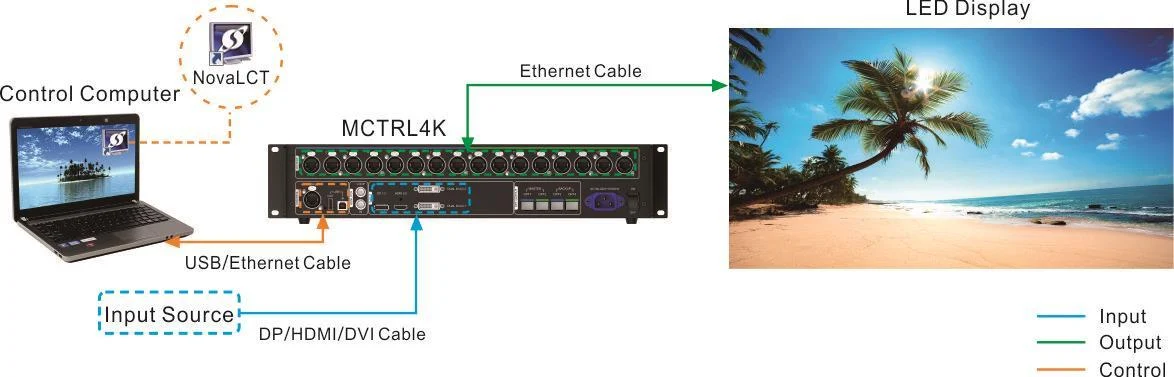
Connect the PC to the controller’s supported USB or network control port. Connect the video source to the controller’s video input.
The control cable does not carry the live picture. Trace the controller’s LED output cable to the first receiving card on each port.
4.2 Set the Computer’s Display Mode and Resolution
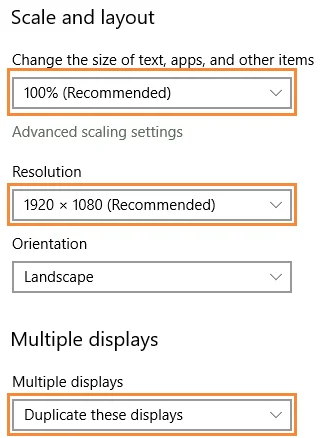
Choose Duplicate to mirror the desktop, or Extend to send a separate desktop to the controller. In Extend mode, move the playback window onto that display.
Four 192 × 192-pixel cabinets across and three high make a 768 × 576-pixel wall. A 1920 × 1080 source fits only if the processor scales or positions it as needed.
4.3 Log In and Open Screen Configuration
Open User and choose the advanced synchronous login. The documented default password is admin; multimedia players use a separate device login.
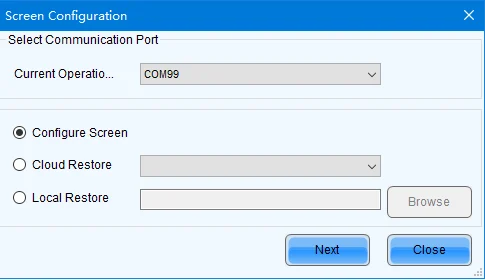
Open Screen Configuration and select the port for your controller. If the device is missing, check the connection before sending settings.
4.4 Configure the Sending Card
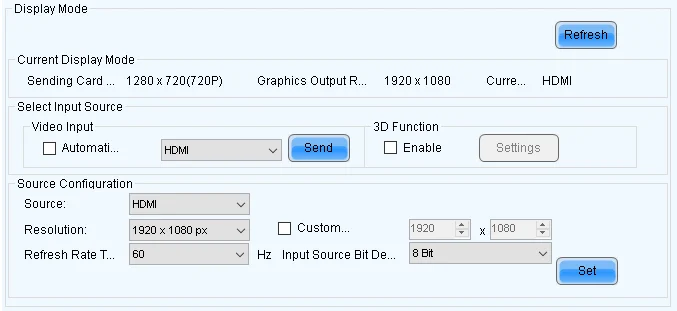
Select the video input in use. Check that the controller detects the expected resolution and frame rate.
Check the load on each output port. A wall can fit the controller’s total capacity while one port exceeds its pixel or width limit.
4.5 Configure the Receiving Cards and Load RCFG/RCFGX Files
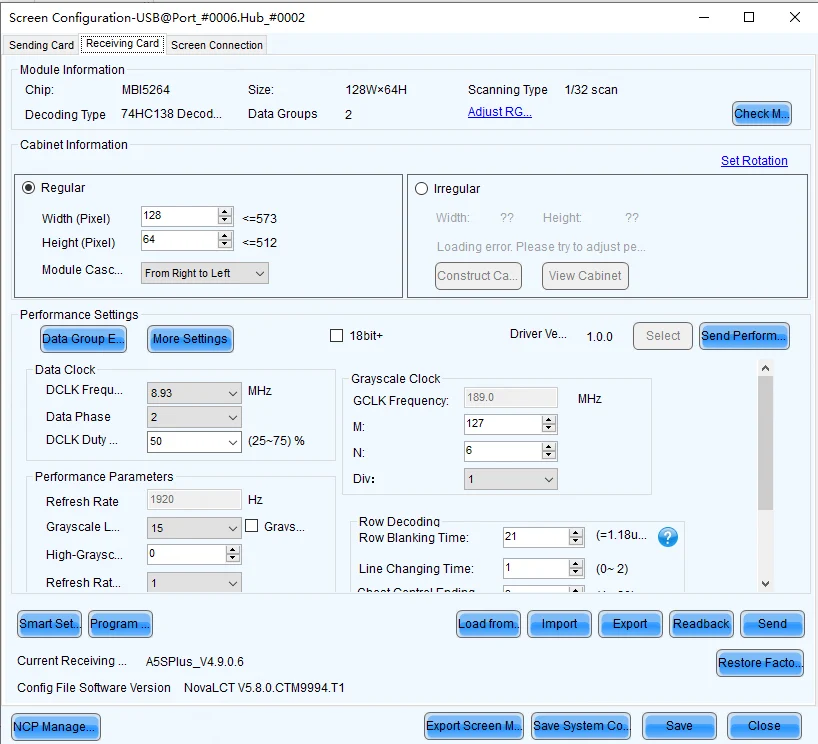
Load the supplier’s RCFG or RCFGX file for the exact cabinet revision. Matching pixel pitch alone does not establish compatibility.
Test one cabinet before sending the file to the rest. If your receiving card requires an NCP file, follow its own setup procedure.
For an existing screen, follow the receiving-card configuration backup tutorial before changing the card settings.
4.6 Set Cabinet Dimensions and Screen Connections
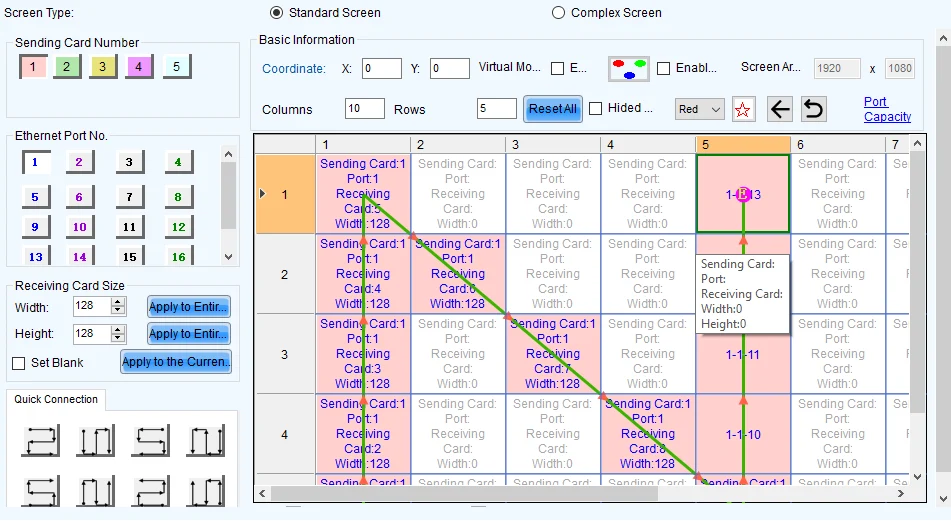
Enter the width and height driven by each receiving card in pixels, not millimeters. Select an output port and map each cabinet in the order its data cable reaches it.
On a zigzag route, the second row runs in the opposite direction. Check whether your drawing shows the wall from the front or the rear.
Already have an SCR file? The screen-connection file tutorial below shows how to load it. An SCR file describes cabinet positions; the receiving-card file describes cabinet electronics.
4.7 Verify Cabinet Mapping and Test the Display
Display a numbered grid and check the corners, row changes, and port boundaries. Every number should appear once, in its expected position.
Then test solid red, green, blue, and gray. If the wall will be filmed, check the image through the production camera as well.
4.8 Save Settings to Hardware and Export a Backup
Sending settings tests them; saving to hardware keeps them after restart. Once the picture is correct, use Save or Save to HW for the intended devices.
Export a dated backup. During the maintenance window, restart the controller and check the numbered grid again.
5. NovaLCT vs SmartLCT: What is the Differences
Choose the application your controller supports. Use NovaLCT for a project that requires NovaLCT; choose SmartLCT for visual layout only if it supports your hardware.
5.1 Where to Download SmartLCT
Choose the SmartLCT package for Windows or Mac. V3.5.14 is the newest release listed on NovaStar’s SmartLCT download page.
For V3.5.14, open the official page below and select Windows or Mac. Use an older package only when your project requires that version.
| SmartLCT Version | Windows | Mac |
|---|---|---|
| V3.5.14 (Latest) | Official download page | Official download page |
| V3.5.13 | Download | Download |
| V3.5.1 | Download | Download |
| V3.2.0 | Download | — |
5.2 SmartLCT System Requirements and Platform Support
The SmartLCT V3.5.13 manual lists Windows 7 or later and macOS 10.10 or later. Check your actual release and computer before taking it onsite.
5.3 NovaLCT vs. SmartLCT: Which Should You Use?
Use the table to compare platform support and setup tasks. Check file compatibility before switching tools on an existing project.
| Decision | NovaLCT | SmartLCT |
|---|---|---|
| Computer platform | Windows package in the checked catalog | Separate Windows and Mac packages |
| Main workflow | Screen setup, parameters, and maintenance | Visual cabinet configuration on supported systems |
| Existing project | Retain the documented NovaLCT environment | Retain the documented SmartLCT environment |
| File transfer | Check the actual import dialog and file type | Do not assume complete projects are interchangeable |
| Final choice | Match controller, receiver, firmware, required functions, and operating system | |
6. Common NovaLCT Problems and Troubleshooting
If NovaLCT cannot find the controller, check the PC connection. If it detects the controller but the cabinets appear out of order, check the screen map first.
6.1 NovaLCT Cannot Detect the Controller
Check controller power, the control port, and the USB cable or network adapter. Try a known-good cable before changing screen parameters.
If detection stopped after a driver update, compare the driver and software versions with the last working setup.
6.2 The LED Screen Shows Repeated or Misaligned Images
If a cabinet repeats another cabinet’s picture, check its map position and starting coordinates. If a whole row is reversed, trace the cable at the row change.
Check the physical route against the saved map before rebuilding the layout.
6.3 The Display Flickers or Shows Incorrect Colors
Check whether the fault affects one module, one cabinet, or the entire wall. Compare the receiving-card file and wiring with a known-good cabinet.
If flicker appears only on camera, check camera timing before changing the screen’s refresh settings. Test any adjustment on a small area first.
6.4 Configuration Settings Are Lost After Restarting
Use Save to HW where available, then restart during the maintenance window. If an old layout returns, check whether a startup preset is restoring it.
7. FAQs
8. Conclusion
You may learn how to configure your LED displays after reading this post and gain an in-depth understanding of NovaLCT screen configuration, as well as the differences between SmartLCT and NovaLCT. You can quickly deal with problems during usage according to this guide. If you want to download other Novastar software or .rcfg files, click here to visit the download pages.
 Front Service LED Wall Planning: An Integrator’s Guide
 Bar LED Display: How to Choose the Right Screen for Your Venue
Related Posts


Fill In Your Needs In Detail
Fill in the screen usage scene and size you need in “Content”.You will get a quote.