NovaLCT calibration helps match LED cabinet brightness and color through supported correction coefficients. Back up the working system before making adjustments.
This NovaLCT calibration guide covers diagnosis, cabinet matching, and verification. Use the instructions for your installed software, controller, and receiving cards.
- 1. What NovaLCT Calibration Can and Cannot Fix
- 2. Prepare the LED Wall and Back Up Calibration Data
- 3. Diagnose Cabinet Brightness and Color Differences
- 4. Match LED Cabinet Brightness in NovaLCT
- 5. Adjust Color and Replace Modules or Receiving Cards
- 6. Manual Matching vs Measured LED Calibration
- 7. Save Coefficients and Verify the Finished Screen
- 8. Specify Calibration Support Before Buying LED Cabinets
- 9. التعليمات
- 10. اختتام
1. What NovaLCT Calibration Can and Cannot Fix
NovaLCT calibration addresses differences in emitted light through supported correction data and adjustment functions. It cannot repair damaged LEDs, straighten a cabinet, or make incompatible modules electrically interchangeable. Separate those problems before deciding that a visible patch needs calibration.
Brightness uniformity describes how evenly the wall emits light. Color uniformity describes whether adjoining areas reproduce the same color under the same input. Absolute color accuracy adds another question: does the whole display reproduce the intended reference?
A wall can be uniform while every cabinet has the same incorrect white point.
A global brightness control changes the wall’s operating output. Local coefficient adjustment changes the relationship between selected pixels, modules, or cabinets. These controls have different purposes.
Reducing the entire wall’s brightness may make an inconsistency less noticeable without correcting its underlying spatial pattern.
01. Understand configuration files and correction data
Keep receiving-card configuration, screen connection mapping, and calibration data as separate project records. Cabinet electronics determine how pixels are driven; mapping determines where image regions appear; correction data supports optical uniformity.
An approved receiving-card file alone does not establish that the correct optical correction is present.
For basic configuration work, use EagerLEDالصورة دليل تكوين شاشة NovaLCT. This article assumes the wall already displays the correct image geometry. Completing NovaLCT calibration on an incorrectly mapped screen risks applying otherwise valid data to the wrong physical area.
02. Define the achievable result
LED bins, operating hours, temperature, driver behavior, and optical construction influence matching. Correction works within the performance available from the hardware. If one batch cannot reach the required output and color together, the project may need a revised target or matched replacement stock.
NovaLCT calibration should not become a reason to accept unsuitable cabinets.
2. Prepare the LED Wall and Back Up Calibration Data
Prepare NovaLCT calibration as a controlled maintenance task. Reserve access to the full wall, stabilize the operating conditions, and agree on a restoration procedure before changing coefficients. A service laptop with the right software is only one part of that preparation.
Record the controller and receiving-card models, firmware, NovaLCT version, cabinet revision, and module batch information available from the supplier. Establish whether the installation uses a synchronous controller or a multimedia player.
Their login and operating procedures differ; a tutorial for one should not be followed blindly on the other.
Operate the wall until its output is sufficiently stable for the intended assessment, following the supplier’s warm-up guidance. Keep ventilation, room lighting, source format, and screen brightness consistent during comparisons.
Do not invent a universal warm-up time: the appropriate condition depends on the display and test method.
| Record or condition | ماذا يجب التقاطه | لماذا يهم |
|---|---|---|
| هوية الأجهزة | Controller, receivers, module revision, firmware | Confirms the supported adjustment workflow |
| Original project files | Receiving-card settings and connection map | Preserves the working electrical setup and layout |
| Correction backup | Available coefficient database and cabinet identities | Allows restoration without guessing previous values |
| شروط الاختبار | Brightness, source, warm-up state, ambient light | يجعل المقارنات قبل وبعد ذات مغزى |
| خطة القبول | Patterns, measurement points, viewing positions | Defines how the client will judge the result |
NovaLCT calibration preparation should include a readable cabinet drawing. Label physical positions and distinguish a front view from a rear view. A diagram that reverses the wall can turn a careful adjustment into a correction of the wrong cabinet.
For NovaLCT calibration, store the untouched backup separately from the working copy. Name files by project, date, layout, and hardware revision. Confirm that the intended software can open the files before relying on them for restoration. Unexplained exports do not provide an effective handover.
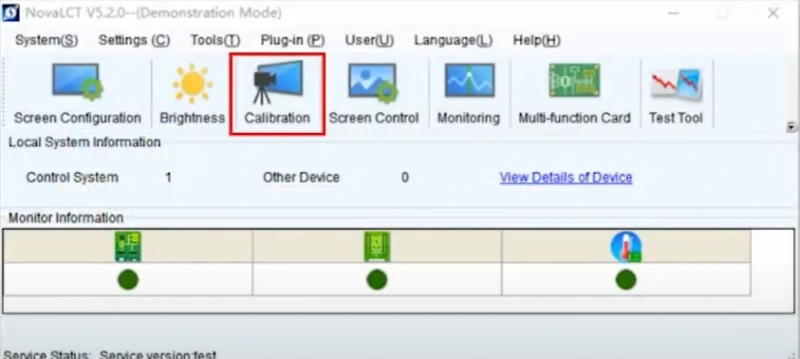
Legacy NovaLCT demonstration interface with Calibration highlighted. Menu appearance varies by release.
هذه EagerLED tutorial demonstrates loading receiving-card configuration files. It supports preparation and recovery; it does not demonstrate optical coefficient measurement.
3. Diagnose Cabinet Brightness and Color Differences
Begin NovaLCT calibration diagnosis by identifying the size and behavior of the defect. Is the mismatch one pixel, one module, a complete cabinet, an output-port group, or the entire wall? Its boundary often provides a better first clue than its apparent color.
Use solid red, green, blue, white, and several gray levels. Inspect from the specified audience positions and a consistent angle. A primary-color pattern can expose a weak channel hidden in white. Gray patterns reveal differences that high-brightness content may conceal.
Compare the controller’s internal test pattern with a known source image where supported. A defect that appears only with one source needs investigation of the video path, range conversion, scaling, or content. Do not compensate for a source problem by permanently changing cabinet correction.
| عرض | تحقق أولاً | الخطوة التالية المحتملة |
|---|---|---|
| One cabinet is evenly brighter | Applied correction state, hardware revision, saved data | Restore valid data or assess local brightness matching |
| A module looks pink on gray | Individual RGB patterns and replacement history | Check module compatibility and local color correction |
| A narrow dark seam | Mechanical alignment, mask edges, viewing angle | Correct physical causes before line adjustment |
| Mismatch returns after restart | Persistent save and any startup restoration | Investigate storage and restoration behavior |
| Only camera footage shows bands | Camera exposure, shutter timing, display settings | Perform a separate camera and display timing assessment |
| Output drifts as the wall warms | Cooling, temperature, operating conditions | Stabilize the hardware before optical assessment |
At this stage, NovaLCT calibration is a candidate remedy, not a diagnosis. Check power, data connections, and module seating through the supplier’s service procedure when the symptom suggests a hardware fault. Do not raise drive settings to hide a failing connection.
During NovaLCT calibration diagnosis, document each suspect position with the pattern and operating condition. Photographs help locate the issue, but automatic exposure and white balance can alter its apparent severity.
Record visual observations separately from instrument measurements and retain the original test files.
4. Match LED Cabinet Brightness in NovaLCT
For NovaLCT calibration of a uniformly bright or dim cabinet, establish a suitable reference and adjust only the affected region. First determine whether the cabinet has lost its original coefficients. Restoring valid correction data is preferable to building a new visual compensation around missing data.
01. Open the supported coefficient controls
In the documented synchronous workflow, open Tools > Calibration, select the intended screen, and use Manage Coefficients. Confirm the communication target and selected area.
The relevant manual describes local selection and simple RGB coefficient adjustment; available options depend on the connected system.
Treat the selected region as an explicit work boundary. Verify its physical location before writing a change. If one receiving card drives several modules, selecting that card may cover more than the replacement module you intend to match.
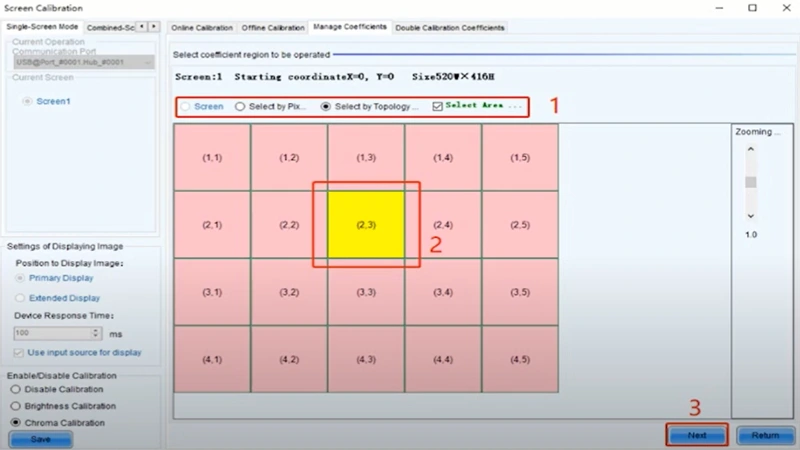
Legacy NovaLCT interface example: selecting a cabinet area before coefficient adjustment.
02. Make limited adjustments against a stable reference
Choose a healthy neighboring area with the same intended hardware and operating condition. Use white and mid-gray for comparison, then check the primary colors. Begin with a small adjustment and observe its effect before proceeding.
Keep a change log so you can distinguish an improvement from accumulated trial and error.
NovaLCT calibration should preserve useful operating headroom. Bringing stronger regions toward a realistic shared target may be more practical than trying to force the weakest area upward. The appropriate target must still meet the project’s brightness and color requirements.
If reducing the difference on white creates a tint on gray, stop treating the problem as a single brightness offset. Recheck RGB behavior and correction data. A cabinet that differs by channel or grayscale level needs a broader assessment than equal movement of three controls.
Finish this NovaLCT calibration stage by checking the selected cabinet against more than one neighbor. Matching two adjacent units alone can leave a gradual brightness slope across the wall. Revisit the overall reference and ensure the local improvement has not shifted the defect to another boundary.
5. Adjust Color and Replace Modules or Receiving Cards
NovaLCT calibration for a color mismatch starts with compatibility and data restoration. Confirm that the replacement module or receiving card belongs to the approved cabinet design.
Matching pixel pitch or physical dimensions alone does not establish matching LEDs, driver settings, scan behavior, or optical characteristics.
01. Evaluate RGB balance across gray levels
For NovaLCT calibration, check neutral grays before judging finished video. A white field can look acceptable while dark grays show a colored rectangle. Compare multiple levels with unchanged source processing.
Also inspect natural content with skin tones, gradients, and saturated colors that matter to the application.
The documented advanced coefficient controls include channel-related brightness, hue, saturation, and color-temperature adjustments. Use them for a defined correction with a repeatable reference.
Changing several variables together makes it difficult to identify which change helped and which introduced a new error.
White-point adjustment is not a substitute for gamut verification. Two cabinets can show similar white while reproducing a saturated brand color differently.
Where color reproduction is contractual, define the reference, measurement conditions, and acceptance criteria rather than accepting a white-only comparison.
02. Restore the correct replacement-area data
NovaLCT provides dedicated coefficient operations for replacement receiving cards and modules in supported workflows. Use an applicable database when available.
Reference-area approaches can help with matching, but borrowing a neighbor’s average does not recreate a replacement module’s original pixel-by-pixel measurement history.
For service planning, review the available LED screen module formats with the cabinet supplier and request the exact revision needed. Verify the replacement’s electrical and optical suitability before installation. NovaLCT calibration cannot resolve every difference between production batches.
Preserve module and cabinet identities when tracking correction files. A position-based screen database and an identity-based cabinet database serve different layout assumptions. After moving cabinets, verify the relationship between data and physical hardware before uploading anything.
Mixed inventories also deserve a batch-level assessment. Where supported, multi-batch adjustment offers a workflow for reconciling groups of cabinets. Establish representative samples and an achievable shared target.
A mixed wall should be evaluated as a complete inventory, rather than as a series of isolated patches.
6. Manual Matching vs Measured LED Calibration
Manual NovaLCT calibration can reduce visible regional differences, while measured calibration establishes corrections from instrument data. Choose between them by defect scale and acceptance requirements. A technician’s visual match and a measurement report answer different questions.
Visual adjustment is useful when a small, understood mismatch needs practical correction and the project accepts visual verification. Visual matching becomes less dependable with pixel-level variation, grayscale differences, or mixed cabinet batches.
Repeatable acceptance under defined conditions may require measurements.
| الأسلوب | تطبيق مفيد | Limit or requirement |
|---|---|---|
| Visual regional adjustment | Small cabinet or module mismatch with a reliable reference | Observer-dependent; does not establish measured accuracy |
| Restore existing coefficients | Known data loss or replacement with valid records | Requires correct hardware identity and applicable data |
| Colorimeter-assisted assessment | Repeatable regional brightness and color measurements | Measurement coverage and supported software matter |
| Camera-based pixel calibration | Spatial variation requiring pixel-level correction | Needs an appropriate measurement system and controlled capture |
NovaLCT calibration is part of a wider ecosystem: supported online workflows can work with NovaCLB. Do not assume that installing NovaLCT supplies a calibrated camera, a colorimeter, licenses, or a complete measurement procedure. Confirm the equipment and software required for the intended method.
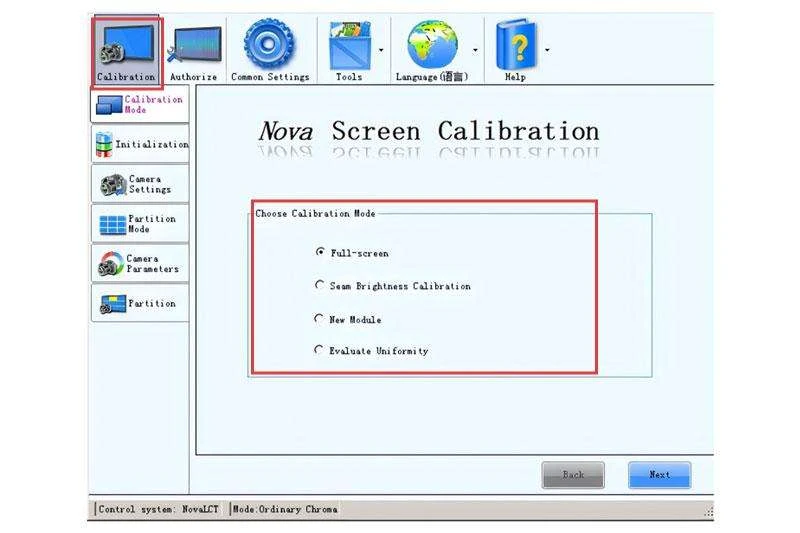
Legacy NovaCLB calibration-mode example. Select a workflow supported by your measurement system.
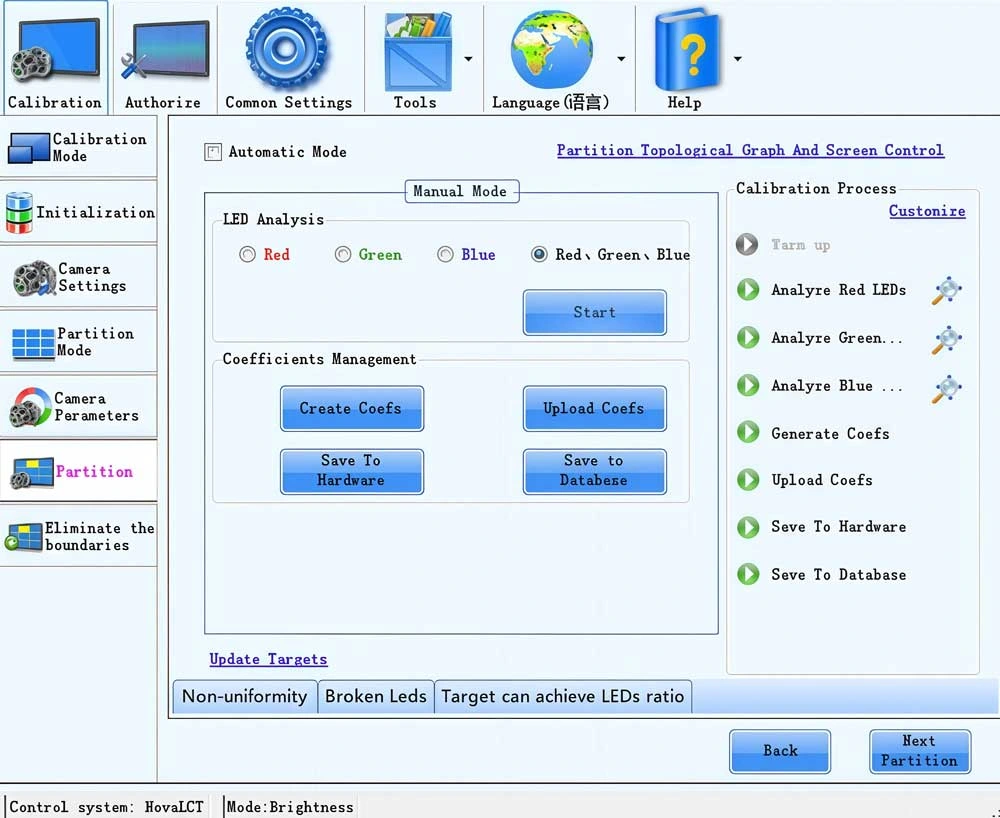
NovaCLB interface example showing RGB analysis and coefficient management; not an installation measurement.
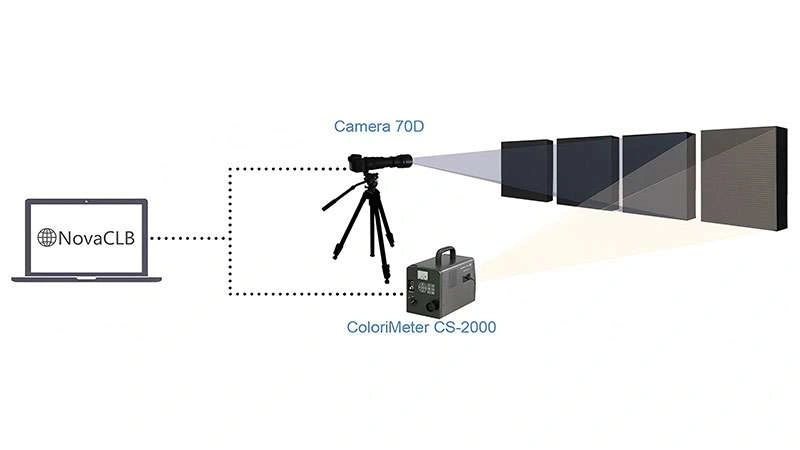
Illustrative measurement workflow. The depicted camera and colorimeter are examples rather than a compatibility recommendation.
Measurement quality depends on setup. Ambient light, capture geometry, focus, exposure, and the stability of the screen influence the evidence collected. A camera image with clipped highlights cannot reliably describe the differences it has clipped.
Follow the measurement-system instructions and inspect the capture before accepting a coefficient calculation.
Specify tolerances with the measurement method. A claim such as “excellent uniformity” does not define the sampling grid, operating brightness, white point, or allowable difference.
Agree on these conditions before commissioning, and identify whether acceptance covers the audience view, the production camera, or both.
A measured service may cost more and require controlled access to the installation. Compare that scope with the time spent repeatedly touching up a mixed inventory. The decision should account for repeatability, downtime, and future replacement work, without assuming a universal calibration price.
7. Save Coefficients and Verify the Finished Screen
NovaLCT calibration is complete only when the accepted correction survives the required operating sequence. A change visible during adjustment does not prove that the correct data has been saved persistently to the intended hardware.
After NovaLCT calibration, follow the documented save operation for the function used, then export the accepted correction data. Keep the original baseline and the final accepted version. Record which cabinets or modules changed, the method used, the operating conditions, and any remaining limitations.
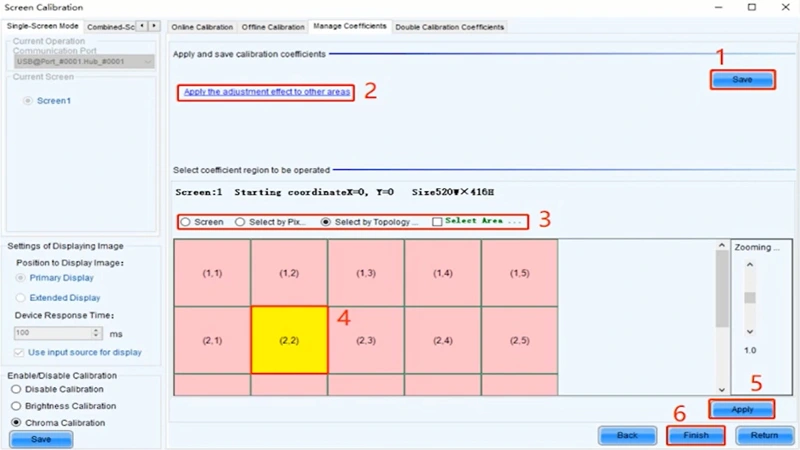
Legacy NovaLCT example showing coefficient-save and area-application controls. Follow the instructions for the installed release.
During the agreed maintenance window, restart the system and inspect it again after stabilization. Include receiving cards in the test scope; restarting only the PC does not test every device’s retained settings.
Check for automatic loading of another dataset or operating preset if the former mismatch returns.
Use a progression of tests: solid primaries, white, gray steps, gradients, and representative program material. Evaluate the normal dimming range as well as the commissioning level. Avoid claiming a universal numerical pass threshold when the project has not defined one.
When verifying NovaLCT calibration for camera applications, lock the intended camera settings for a repeatable test and involve the production team. Assess flicker, scan artifacts, and color reproduction separately. A visually uniform LED wall can still require timing or processing changes for filming.
NovaLCT calibration records should include an exception list. Mark a defective module awaiting replacement, a batch that cannot reach the target, or a test condition unavailable onsite. An honest limitation is more useful to the maintenance team than a generic declaration that the display is calibrated.
Include a recovery procedure in the NovaLCT calibration handover. Identify the wall, approved software, and accepted files. Document restoration steps and repeat the acceptance patterns.
Store a second accessible copy with the responsible service organization so recovery does not depend on one technician’s laptop.
8. Specify Calibration Support Before Buying LED Cabinets
Specify NovaLCT calibration support as part of the LED system purchase. Ask how correction data is created, supplied, restored, and maintained after component replacement.
A quotation that names a control brand without identifying the hardware and service deliverables leaves essential commissioning work undefined.
في عمل rental LED display inventory, plan for cabinet rearrangement and mixed usage history. For permanent installations, plan for accessible backups, replacement modules, and a consistent service reference. Both benefit from clear ownership of the accepted correction files.
| اسأل المورد | Request as evidence | قرار القبول |
|---|---|---|
| Which control combination is supplied? | Exact controller, receiver, firmware, and software schedule | The required correction functions are supported |
| How are coefficients delivered? | Applicable databases, identity records, restoration instructions | The service team can recover the accepted wall |
| How are replacements matched? | Module revision and spare-stock matching procedure | The plan covers both electronics and appearance |
| How is uniformity accepted? | Patterns, conditions, measurement method, agreed limits | Buyer and supplier use the same test |
| Who handles later correction? | Scope of support, onsite responsibilities, exclusions | Future service and downtime are understood |
NovaLCT calibration capability should be demonstrated with the proposed cabinet and control combination. Ask for a replacement-module exercise and a restart check during acceptance. These practical demonstrations reveal more about maintainability than an isolated software feature list.
Discuss the testing process alongside EagerLEDالصورة LED display quality-control information. Project-specific acceptance still needs an agreed scope: factory inspection, installed-wall checks, and future recalibration are separate deliverables.
Retain cabinet serial numbers, spare locations, and approved replacement revisions in the asset register. Buyers and distributors who maintain this information give future service teams a way to trace differences before making adjustments.
That record also helps determine whether a newly delivered cabinet belongs in an existing wall.
Technical reference: NovaStar NovaLCT V5.9.2, Synchronous Control System User Manual, Chapter 6. The manual supplied through EagerLED documents the supported functions; interface screenshots illustrate release-specific examples. Use the manual matching your installed release.
9. التعليمات
10. اختتام
Effective NovaLCT calibration combines correct hardware, reliable backups, and a clear diagnosis. Verify brightness, color, and persistent storage before accepting the wall.
أرسل EagerLED your cabinet model, control-system details, layout, and mismatch photographs. Discuss calibration support and acceptance requirements before ordering replacements.
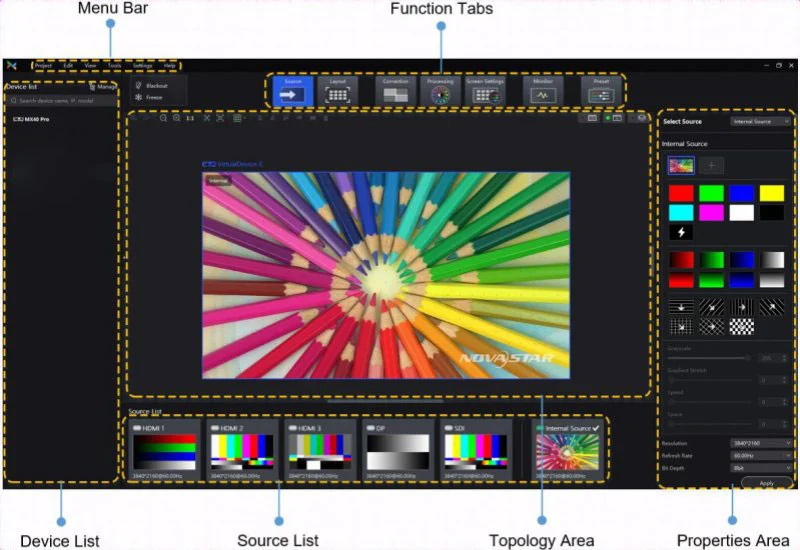 NovaStar VMP مقابل NovaLCT: أي البرامج تحتاجها شاشتك؟
منشورات ذات علاقة

املأ احتياجاتك بالتفصيل
أدخل مشهد استخدام الشاشة والحجم الذي تحتاجه في قسم "المحتوى". ستتلقى عرض سعر.